Showing posts with label hot glue. Show all posts

Tuesday, February 19, 2013

Halloween 2012: Homemade Vampire Princess Costume

I took some time away from the blog to get some real-world stuff done, most of it involved travelling to warmer climates. Haven't had time to sew much, but thought I'd jump back in where I left off-  Halloween!

My daughter wanted to be a "Vampire Princess" for Halloween which sounds ludicrous because it is, but she is 5 and I guess I should just be happy she wanted to be something only sort-of scary and that she didn't want to be a sexy kitty or something truly horrifying. 
A Homemade Vampire Princess Costume! 
This was her final fitting-- if you look close you'll see the trim isn't applied around the edge of the train yet and no black, bedazzled plastic crown.  The necklace was made with a black choker I had leftover from the '90s and a black brooch piece I picked up in Michael's tacky-jewelry making department.
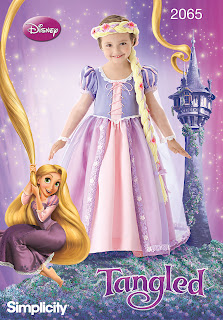
I once again started with a commerical pattern and then totally ignored it.  The pattern in this case was Simplicity 2065, the "Tangled"-inspired Rapunzel costume.  I chose it because I thought it was more Medieval looking then the more poofy princessy dress patterns which kind of all look like overwrought 1950s ball gowns, really. 

 I got this on sale, so I don't feel quite so bad about barely using it.

For the bodice:  I immediately made some changes.  I omitted the ties and so adjusted the pattern pieces down an inch or so, making the center "stripe" a little thicker all the way down.  I also raised the neckline since all the Disney patterns seem to have a low neckline problem.  Plus, vampires don't wear a scoop-neck. I discovered over on PatternReview.com (beginner's tip:  pay the money and join, it is totally worth it!) that the neckline was also a bit wide so I narrowed that up too.  Instead of a zipper I put in Velcro.  My Aunt Gail helped me to figure out exactly how to place that-- I had it pinned in wrong for a couple of days and couldn't figure out how to fix it.  I also may or may not have lengthened the bodice-- I honestly can't remember, but it seems vaguely true.  I also omitted the stripes on the puff sleeves and instead of a sheer arm I went with a dark red shantung.  Insetting the puff sleeve was no problem at all.  Super easy.


Have I ever mentioned how difficult it is to tailor anything to a child?
 "Stop moving so I can poke you with pins!"

Please note these are the first full length sleeves I've made.  Yeah for me!  They turned out pretty well though I realize the straight arm proportions of a kid are much easier to fit than an adult. 


For the skirt portion:  The photo on the cover of the pattern is totally misleading.  Either that girl is wearing a crinoline or she has an enormous elephant ass.  Either way, if you follow the pattern your skirt will NOT be as full as the picture.  It's a simple drindle skirt (which I didn't even know what that was until I made this, but think Oktoberfest Barmaid instead of Cinderella) and is damn boring.   I didn't want poofy but I guess I didn't want flat either.  As soon as I cut it out and pieced it together I knew I was going to have to fancy-it-up somehow. 

The train (again without the trimmed edge). 
The curve was key; leaving it a rectangle would have looked stupid.

My solution was to convert the sheer overlay that split in the front into a full on Princess Diana-esque lace train.  Okay, maybe not that long, but chapel length at least.  This took math, figuring out where to place the lace, how many inches in to make it even at the sides and fashioning a curve (on my own) so it would puddle prettily on the floor.  I have no idea how I figured it all out, but I did.  I omitted the lace trim along the seam with the bodice since I was going to have to insert the lace train. It's a little hard to see in the photo but I flipped down the top of the lace so it had a nice ruffle along the inserted seam in the back.  I finished the train with matching trim and then sewed in a hook and eye to bustle it... which is something I always do backwards.  This costume was no exception. I then hand sewed it small plastic spiders scattered into the lace.  Bats would have been better, but they had spiders at the Dollar Tree so that's what we used.


The bustle hooked up. 
This was Halloween night, when it was POURING rain outside, so I was damn pleased with myself for thinking of the bustle.  Note the lace now has a totally trimmed edge.

Notes on the project:  The only real issue I had once the dress was made was the length.  It was about a half inch to an inch too long and she had some problems at school with it.  Because of the weather we trick or treated only a few houses in town so it wasn't a huge hindrance at night since she was lifting it to avoid puddles anyway.  She wore black wrist length gloves which completed the look.  Fake vampire teeth were rejected-  too much spit according to Abby.  I also hot glued the hell out of a otherwise blank black crown adding tons of rhinestones and spiders.

Cost:  I got all the fabric (black stretch velvet, dark red shantung and the matching red lace) on sale.  I had the Velcro, the thread, hook & eye, and reels of black lace trim in my stash at home.  Total cost including the dark princess tiara, gloves, spiders, rhinestones and face make-up was around $80-90.  I'd estimate this costume took me around 16 hours to complete.  If you know what you are doing and actually follow the pattern I'm sure this would take way less time.

Verdict: Success!  It was exactly what Abby wanted which was a vampire costume that was pretty and not too scary.

Abby (The Vampire Princess) and Henry (Alien in Flying Saucer) give the camera their best Halloween scare faces!


Thursday, November 17, 2011

Other Crafts: Feathers, Novels, Tap Shoes & More!

I haven't been posting, but I have been keeping myself busy with all sorts of wacky projects that are being done with my usual massive amounts of enthusiasm and limited skill.  I'm having a costume party next week where I will unveil Cleopatra and a surprise costume!

First up is my attempt at a feathered fascinator!  This project was inspired by a dream I had several weeks ago where I was stuck in India, but dressed as a Gibson Girl.  I know, right?!  You have to act on something like that!  So I made this at my dining room table while my sister sat across from me with clear concern for my mental health.  The look on her face as I arranged feathers and tacky rhinestones was totally priceless.  I may or may not have been drinking.

Nothing says "I doubt anyone reads this blog"  like posting a photo taken with your phone while wearing an orange hoodie and no make-up and  making this face.

I couldn't quite get the angles on the feathers to complement each other right.  Next time!

Sparkle!  Feathers!  Tacky! 

Since I do sensitive HR stuff I have to do all my own filing and can't pawn it off on anyone else at work.  Which sucks. I've been threatening my co-workers with a Friday Filing accessory of some sort for several months.  I considered hats, wigs, even wore a crazy enormous necklace once to make my dutiful filing of important documents more palatable so this madness will actually be worn.  I make no apologies!  Filing is boring.  I'll do whatever it takes to entertain myself.

Notes on the project: 
Feathers are messy.  And I don't know how to use them properly.  I read all the directions on how to thin them, how to curl them, how to shape them, etc., but all I ended up doing is making them shorter and then randomly gluing them to felt.  Oh well! 

Cost:  Less then 40 cents of stiff felt, a hair clip I already owned, left over rhinestones from Cleopatra, and probably $2.00 worth of feathers (more then a few of them were sacrificed as I learned how to cut them).  Took me probably 40 minutes of fooling around.

Verdict:  My sister was surprised that it didn't took entirely insane once it was in my hair... which I guess I'll count as a conditional success?  I'm totally going to make more regardless.  Feathers for everyone!


Next Up:  Nanowrimo 2011 is currently barreling through November.  In case you are unfamiliar, this is National Novel Writing Month where you are challenged to write 50,000 words in 30 days.  I'm including it here as writing is one of my preferred crafts and probably the only one that has ever led to actual achievement... though not with Nanowrimo.  I'm a repeat failure at that.  I've participated with varying degrees of dedication for the past eight years.  EIGHT YEARS, people!  And no, I have not finished a novel yet.  Currently, my Nano-novel for 2011 is at 5,000-odd words, so I'm considerably behind on my word count, but I'm not stressed about it. 

I want this so very, very much.  You can order them restored and ready to type!  Not cheap though and I cannot possibly justify purchasing it. 
Boo.  :(
Notes on the project:
Titled "The Diplomat's Peace" the story is a sci-fi adventure (my first time taking a swing at that genre) about a boy named Oliver who discovers he's not entirely human when his mother dies of an alien-specific virus endemic to the galaxy.  Forced to take refuge among those who would undermine human dominance, he is quickly put to use as a spy, but his divided loyalties put him at risk from both sides.  

Cost:  About a gazillion dollars at the coffee shop.

Verdict:  Likely to fail. I'd have to write like 3,000 words a day for the rest of the month including Thanksgiving. 


Then there is tap dancing which is probably more of a talent then a craft, not that I have any, but I always wanted to do it and so I am. Yes, I am 35 and no, I don't care how I might look. 

When I put these away in my closet I realized that I own 5 pairs of black patent leather shoes.  I think I've been trying subconsciously to get myself some tap shoes for years now.

Notes on the project:
I am not very good.  At all.  But it is so much fun!  I begin formal lessons in January.  So far all I've mastered is the Tap-Touch-Shuffle, but it looks like real dancing.  There will be no video uploads for the blog.  Sorry to disappoint!

Cost:  $40 for the shoes, $0 for clothes as I have endless amounts of workout clothes that can double as dancewear with a pair of fishnets, and $80 for the first set of lessons. 

Verdict:  more fun then exercise, I'll have to skip a Monday night spin session to go to the class and I can't decide if that makes it a life fail or a joy win.


Then I made this bracelet.   My kindergartner got in the car about two weeks ago and told me I was worth lots of rubies.  He'd learned the Biblical proverb at school: "Who can find a worthy woman? For her price is far above rubies."  Really, outrageously sweet.  I then turned on the radio to hear, back to back, Alicia Keys, "A Woman's Worth" followed by Toni Braxton's "He Wasn't Man Enough For Me".  It was '90s R&B awesomeness.  I haven't heard those songs in forever! (Retro Lunchbox on Alice FTW!) Anyway, it stuck with me, the idea of rubies and value and not forgetting that a 5-year old boy (at least) thinks I'm amazing. 

I need to find my real camera, it has been missing now for like three months.  These photos are terrible.

You can't tell in these photos, but this is asymmetrical and far cuter in person. 
Notes on the project: 
crepe-back satin is a surprisingly easy material to embroider, though it does pucker a bit if you pull too hard, but the same can be said for cotton.  It is prettier in person, more depth and shimmer.  I enjoy embroidering and I'm going to do it more often I think.  It really is too bad that I can't draw.  I need someone who can draw for me!

Cost:  Free.  I had everything on hand.

Verdict:  I also need a stamp that says "Validated!".  You know, like they have for parking? I can go around stamping other women's hands with it when I seem them doing something they don't actually need to be doing.  I think the stamp will accessorize nicely with the crazy feathers and tap shoes.

Tuesday, November 1, 2011

Halloween 2011: Homemade Kids' Costumes FINISHED!

 Halloween did not go smoothly this year.  My daughter and I are both sick.  Poor Abby has missed a week of school.  My husband lost me and was nearly convinced I'd been kidnapped (I was waiting for him at the end of our driveway... with a flashlight).  My costume is only 90% done on November 1st.  We only trick or treated about 6 houses in total.  It took us longer to drive into town. All in all, a poor showing considering the amount of forethought put into this holiday. That said, the kids sure looked great!

No jacket version with whip and idol.

Henry's costume was a huge hit at his school.  He had to leave the whip at home since it is technically a weapon, but he brought the legendary artifact, "The Glittering Gargoyle".

I tried to get Henry to make up an adventure to go with this "artifact" but his tale sounded suspiciously like the beginning of Raiders of the Lost Ark. "And then there is traps!  And a big rock!"  He knows better then to mess with a classic, I guess.
This was made with a Dollar Store statue, some gold spray paint and about a thousand rhinestones.  And hot glue!  I burned the hell out of my hand before realizing it was way easier to spread the glue directly on the statue instead of trying to dot glue to the back of each tiny stone.  I'm an idiot. 
Indiana Henry prepares for adventure surrounded by his sidekicks.  His "girlfriend" is the mermaid on the end.  Dr. Jones is a ladies man.

Jacket version.  I have no idea why he is winking. He's a charmer!
The whip started life as a complicated five strand weave.   I was using a two lengths of yarn for each "strand" so that it would be thick enough.   This was a disaster that required a glass of wine before I started over.  I gave up on the 5-strand/pair approach quickly.  I ended up braiding two sets of three and then plaited them with another set of two strands of upbraided yarn to make it.   The handle is duct tape as you can see, (which was super stable and by far the easiest way to make a handle).  The tape was wrapped in black ribbon in an overlapping x-pattern at one point, but that did not last until today.  I'm too lazy to re-do it so you'll have to trust me that it looked fine. 

Pumpkins from the garden behind her... we never carved them.  We're slackers.

Snow White, while very ill, posed like a champ for these photos.  Her collar and cape were made without a pattern because, again, I'm an idiot.   I buy patterns and then just do what I want, apparently.  I've yet to follow an entire real pattern.  I alter the hell out of them despite the fact that I don't know how to sew.  I have no excuse!  Her accessory here is a tweeting blue bird like the ones that follow Snow White around.  Abby also has a plastic poison apple that did not make it into the photos.

Don't forget the sparkle shoes! 

The collar I drew freehand straight onto the satin and used standard interfacing on both pieces to make it stiff.  To get it to fold over properly, i.e. to frame her face but not block her vision, I sewed small pleats into each edge.  I used Velcro to attach it to the inside of the dress-  I sewed the prickly part to the collar and ironed in no-sew Velcro (soft side) into the dress.  If I'd been smarter I could have sewed it to the lining before assembling the bodice, but I didn't think of that. 

The cape, since I didn't follow the pattern, was super easy.  I seamed two rectangles of red stretch velvet together and used a simple hook and eye as a closure.  To keep it from falling over her shoulders and obscuring the laborious puff sleeves I tucked the edge into the back of the dress between the collar and the bodice- the fabric hooked a bit on the Velcro hidden back there and so didn't slip out.  The cape didn't serve to keep her warm since I didn't have it covering her arms, but it was nice enough here in California that it didn't matter.  The velvet draped really well and I'm glad I didn't use more of the cheap satin. 

A grand curtsy.

Notes on the projects:  Indiana Jones was easy, in part because I bought the pants, shirt and jacket... which is kind of the whole costume.  Really I only made the whip, satchel and idol.  But I did hunt down the hat!  Snow White was much harder and required a whole list of things I'd never done before, including (sort-of) using a commerical pattern and all that entails:  a tracing wheel and pattern paper, cutting notches and matching dots, etc.  Plus, the dress itself required me to sew darts, make sleeves and do insets all of which I'd never done before.  I also tried corded gathering for the first time which didn't work out and I was forced to take in the bodice (alterations!)  and use all sorts of materials I'd never worked with (velvet, satin, metallic trims).  If I made Snow White again using this bodice pattern I'd for sure raise the neckline and narrow the shoulder width.  Oddly, there was never any directions for sewing a seam up the back of the bodice which was weird, but I guess it is pretty clear that it needs to be done.  The true work was done by my housekeeper who cleaned up after me.  It's amazing how many bits of thread and scraps of fabric I can create making small children's clothes.

Verdict:  Boo!  Did I scare you?  Halloween rules.  Learned a ton making these costumes.

Cost:  I estimate these costumes cost me between 2,000 pesos and a gazillion euros.  Maybe 600 galactic credits?  I really don't know.  A LOT is the answer. 

Update on Cleopatra as soon as it's finished-finished!  It's crepe-back gold satin and bejeweled!  I know you can't wait.

Upcoming Projects: Not Yet Blogged

a rundown of what I've been up to: DIY wedding dress, "Back to School Night" decor, Flower Arranging for the Incomptent, more jam labels, a dog bed solution, paper embroidery, flying pig needlework, attempting to scrapbook, make your own board game kit, Link from Zelda costume, organinzing for homework, and how to build an afterschooling program!

how to declutter after a death... and how not to do it

what do you do with all your fat clothes? Make doll clothes!