Showing posts with label organization. Show all posts

Sunday, October 28, 2012

Homemade PECS Visual Schedule for Kindergarten

Thanks, Ryan.  I know. 
Ah, PECS.  If you know what they are without having to click on the link, well then, we're in a special club together, aren't we?  Your kid has autism of some variety or is otherwise "spirited".  Abby's diagnosis matters less and less to me as long as she is getting what she needs to succeed. 

A short day.  Removed one so you can see the Velcro strip beneath.
So, this is what I've been up to on the craft front... though that's more necessity then creativity.  It is a serious pain in the ass, to be honest. We are very fortunate that we only need to use PECS to let Abby know what to expect for the day, as a visual schedule, so please don't think I'm being ungrateful. She has zero trouble communicating and in fact I'd be happy if she STOPPED talking, but she can be very slow to adapt and any unexpected transition has a 50/50 shot at causing her to meltdown like Chernobyl.   The visual schedule is a recommendation from her behaviorist and does seem to help!

I went around and took photos of everything she's likely to encounter in her school day, from her mat at "Morning Mat Time" to her Spanish teacher (who, yes, looks like a model even when I catch her running to her car after school) in order to make Abby individualized images.  This was WAY more labor intensive then I'd anticipated and I seriously appreciate the pre-packaged sets now, but for our situation doing it myself was the only way to go.

And let's not forget about this guy!  Henry doesn't get what the big deal is with the schedule and the stories and the endless appointments and playdates, but is aware his sister is getting some disproportionate attention--  I've solved this by actively playing video games with him.  Sad, but true.  He's thrilled!
 
Obviously there are lots of ways to make your own PECS, but I stole a bunch of ideas from the Internet:

1.  Since Abby doesn't need a million of them to communicate, I went ahead and enlarged the standard format from 2X2 to a much less likely to be lost 3X3 inches.  This makes everything easier to see and read, but it also means commerically available PECS pockets and folders won't work with my homemade ones.

2.  I laminated mine onto cardstock-- this makes them more rigid and sturdy.  I used a non-descript color so I don't have to worry about matching it later when I need to make more.  The cutesy-colored and decorated ones are great and all, but if you have a kid who values "sameness" this is key.

3.   Blank PECS!  This is a brilliant idea.  Like with our chore charts, I just write on the laminated square with a dry erase pen if something unique is happening in her day and I need to give her a heads up.  For instance, I'm not going to make her a special PEC for an "Earthquake Drill" she only does once a month.  Plus, how do you make a non-terrifying image for that??  I stuck Velcro to the pen and attached it to the binder too.

If only these emoticons were gifs...  moving them back and forth with my hands isn't the same.

4.  The folder that IS the chart:  stole this idea from Pinterest but can't find the image now... that said, go ahead, search Pinterest for the word "PECS"...  pretty nice treat for Mommy!  Anyway, this is great.  I used a standard binder (make sure it is the kind that will lay flat), sticky backed Velcro, hole punched sheet protectors and plastic dividers. The dividers must be plastic, the paper ones no matter how sturdy will rip. The sheet protectors keep her "Social Stories" neatly organized, her teacher's rough (to the point of uselessness, but that's just me bitching) daily outline, and her weekly "smiley face reports" safe.  All her interventions are in one place!  The Velcro strips on the cover are for today's schedule, any PECS not being used are stored inside on the dividers.  

Social Stories deserve their own post since they are in some ways the most creative part of this whole mess.  "If I Am Late to School.." is our most recent project.  The ones that gets the most use are "When It is Time to Stop My Work..." and the infamous, "Recess is Over and..."
Things are improving for Abby and I am grateful, but it is intense and, to be honest, costs a fortune.  It leaves me little time for my own hobbies and interests (and friends and sleep and coherent thoughts) so that is why the blog has been dead.  I do have some awesome Halloween costumes to post before the holiday!  Watch out!

Monday, January 23, 2012

2011: The Year I Learned to Sew

My mom loved this stupid blog despite the fact that I update only when I feel like it, make no effort to promote it and take horrible pictures, usually with my phone.  She died the day after Christmas; she was 56.


In fact, my mom loved all my lame attempts at making stuff.  My Etsy shop was a thrilling endeavor in her eyes and she'd patiently been waiting for me to hurry up and finish a damn novel since I was ten. For my 35th birthday in October she and my siblings bought me (a sure to be awesome) serger that ought to arrive in the next week.  I'll be posting my enthusiastic attempts at creation with that machine too, so watch out Internet.   

I haven't made anything yet this year, still working things out in my mind and haven't had the focus or drive, so in the meantime, here is a rundown of the sewing and craft projects that didn't make the blog in 2011 because I couldn't get my act together to get them up:

1.  Abby's mermaid costume:  made for a winter-time "Mermaids & Pirates" themed birthday party thrown by one of her best little friends.  The dress is a simple pinafore in crushed panne velvet.  It is unlined because I figured she'd only wear it once anyway.  I used an iron on mermaid patch that Abby fell in love with at the fabric store on the front and used Velcro down that back instead of buttons.  I had many things going on at the time so pictures are what the are:

Best full length photo I took, sadly.


Poor Ariel had to field a lot of questions about how she can live underwater.

Abigail the Angry Mermaid:  Nap time!
The fin is made of some sort of sparkly synthetic material and backed in the same crushed velvet-  trust me, it was awesome, despite how it might look in these photos.  I made it without a pattern, just drew it on the back of the fabric (on the fold so that it would be symmetrical).  I inserted matching ribbon so that it could be tied on like an apron and easily taken off if she wanted to ditch it (she never did).  I stuffed the bottom of the fin with fabric scraps.  If I made this again I would use thick batting instead so that it wouldn't shift as much.  The shell necklace is a souvenir from a long ago trip to Hawaii and finally had a real purpose.  The most fun for me was the hair clip which was made in about 15 minutes right before the party.  I'll be making way more of these, just better. 

2.  My Cleopatra costume:  made for Halloween, I didn't finish it in time because Abby got sick and I went instead as the Statue of Liberty, a homemade costume I purchased the year before.  The Cleopatra dress is made with crepe back gold satin (very pretty and high quality), lined in bleached muslin and absolutely festooned with tacky rhinestones. 


I used a fantastic product called "Jewel It!" to attach the sparklies.  It worked great and is completely washable. 

The weird cape/wrap thing wasn't easy to sew.  The material is terrible.  The Greek key ribbon looks okay now, but it was an absolute pain in the ass to attach properly, both at the bodice and along the edge of the skirt lining.  Fitting it was ridiculous because I don't have a dress form.  I'd have to mock it up in muslin and then try it on and awkwardly pin and mark myself using the mirror in the bathroom.  Eventually I found it easier to take photos of myself in it so that I could see the how it fit without contorting my body and messing it up.   A dress form is definitely on my list of things to look into in 2012.


Tip for beginners:  The least effective way of fitting a garment is to do it on yourself with a cellphone.

3.  Canvas chalkboards:  I have a joke of a number of standing appointments each day- kids to school and back, gym classes, lessons (piano, dance), sports (soccer, t-ball), personal training, therapy, doctor's visits, vitamin shots, etc.  Oh yeah, and work!  I realized at some point that my husband had NO IDEA what I was doing everyday or why I was always running out the door again.  I bought a set of pre-stretched canvas squares at Michael's and painted them with chalkboard paint leftover from the Library Book Box


They've gone crooked a bit, haven't they? 

Abby is my Cleverbucket and Henry is my Smartypants.  FYI.

I used a sponge brush to cut down on brush marks, but if you look real close you can see them.  It took a couple of coats.  Writing on them was not as easy as I'd hoped since there is no backing to press down on in the middle, but the chalk pens worked okay. These serve as a basic template to each day of the week.  There are always changes and things come up but this is the outline of my life. 

The list of rules for what needs to be done when we get home from school each day has worked especially well with the kids.  I just point to it when I get any fuss about changing out of uniforms or getting snack before lunchboxes are cleaned out.  For whatever reason the fact that the rules are posted makes it harder for my kids to argue a point, despite the fact that they can barely read.  Rules on chalkboards work well in the playroom too.  These were made reusing the Dollar Store chalkboards from Abby's birthday party.


4.  Kid's chore charts:  same goes with the chore charts, having them posted makes getting them to do it way easier!  I made these with my Cricut and a laminating machine.  I've had this set up close to a full year now and it's stood up pretty well.  They are velcroed to the file folders and then hung on clipboards in the kitchen.  I made a few blank ones so I could write down any special tasks or things they don't need to do regularly with a dry erase pen.  At the end of the week they get a coin (penny or quarter whatever I have on hand) for each star on their chart. 


Mostly pictures because I made these before Henry could read at all.

The book and pencil used to be for writing practice but Henry now interprets it as homework.  Which he has everyday so I need to make more.  I never had homework in Kindergarten! 

Clorox wiping the door knobs is probably her most serious "job".

Stars!  I should earn some stars for making them do their chores- that's the hard part after all.
The only downside to the chore chart system is that you have to monitor and enforce it as the adult and a lot of times I'm just too lazy.  Chores are done haphazardly in our house.  Some weeks I'm on it with the kids, other weeks, not so much, but they are still really young and the chores (other then feeding the dog and brushing their teeth) are not exactly high priority jobs or even really "jobs"-  more like "life tasks" that will get done regardless of whether or not I chart it.  I've found being lazy is the biggest impediment to good parenting.

5.  More Doodle Stitching:  I worked on these while at the hospital with my mom.  They were already traced out originally for Abby's mermaid costume.  As a person who has spent a lot of time in hospitals (and I have in the last several years, way more then I'd wish on anyone) I will tell you that eventually you find yourself  bored out of your mind.  It is a particularly draining kind of boredom since it festers beneath worry and helplessness whether you are the patient or not and I have been both.  Embroidery is the perfect task in that it is portable and easy to start and stop.  It is both mindless and focused. 


I have no idea what to do with these now.  More nautical hair clips for Abby?
Embroidery keeps you busy, but keeps you in the moment-  it isn't engrossing in the same way a book might be and you can chat and seem generally available to nurses/doctors/family/friends.  I did forget to bring both scissors and thread though.  Tip for (hospital) beginners:  dice and a pen and paper can save you from terrible anxiety.  My sister keeps dice in her purse (because she's awesome) and she once kept me company in a surgical waiting room by playing Kismet for, like, three hours. No joke. Also no joke?  I bought a pound of dice from Amazon for my husband for Christmas. 


I should organize this drawer.  This looks like we are hardcore gamblers. 

He was... confuzzled.  I thought it was a fun gift!  Who doesn't like dice?  I still need to throw a Farkle party.

Saturday, August 6, 2011

Sewing Project: Custom Basket Liner

No real post to go along with this one- it is pretty straight forward. I had this old long basket which is a great shape, but was not IN great shape. So I lined it!


Used the same un-named fabric I used for the ironing board cover. Not sold on the ribbon bow, not really me, but it's fine. If I ever do it again I'll insert elastic I think and sew it closed. A bunch of mismatched baskets lined in the same fabric is a great way to get rid of them at a yard sale, I think. Somebody's grandma would buy them! I'm really not a basket kind of girl.


Perfect for protein shake mix and bars to grab running out the door. Much needed accesible storage for those since I'm going to lose ten more pounds before my birthday so I can at least turn 35 weighing what I did before I had kids. A small victory against the passage of Time. Time is such a jackass!


Only difficult part of this project was the math. I have serious difficulty not with numbers, but with seeing them in three dimensions. Width, length and height are not terribly esoteric concepts yet my mind gets confused. Hence all the arrows. Don't laugh! It worked.

Friday, June 17, 2011

Other Crafts: Library Book Box with Chalkboard Due Date

In blog news, finally customized my header and shifted around my template a bit.  It's awfully pink, isn't it?  But it feels happy and I like it for now.

On to those other crafts I really have no business doing!  I take the kids to the library pretty often which makes me a good mom.  However, I frequently return books late which makes me a bad library patron.  This character flaw persists despite the fact that I spent years working in libraries.  Blog confession:  I had to pay for a book I checked out from UC Berkeley- WHERE I WORKED- because I lost it.  See?  Bad library patron.  And awkward conversation with your boss. 

I want to instill the same love and respect for books and learning in my children that I have, but would prefer if they didn't inherit my poor return habits.  I also hate realizing I need to return the books and then having to tear apart the house in a frenzy (because they are late) trying to find them. I needed a spot to keep them all together and a reminder of when they are due.  So this is my solution:

No more misplaced or overdue library books!

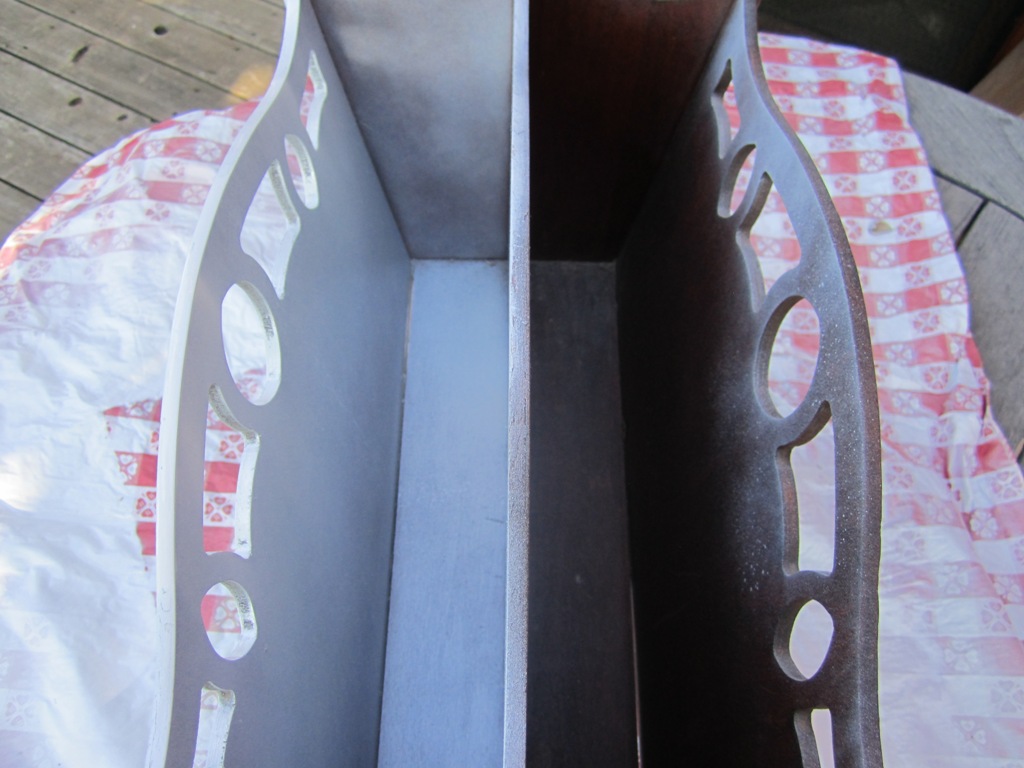
It started life like this:

The wood looks pretty nice in this picture.  It is not.

I bought the magazine rack at an antique shop in town. Thrift shops seem to be littered with them, they must have been a '70s household staple, but like ashtrays that also clutter up second-hand shops, nobody uses them anymore.  As a nation we've apparently quit smoking and canceled our magazine subscriptions.  I was able to talk the owner down to $5 by playing the "hey, I'm a local, possible return shopper and I've got cash" card.  Sometimes it is good to live in a tourist town.  I liked the shape of it, with the little cutouts and it seemed sturdy enough for books.  A lot of the other old magazine racks I'd found had slat sides which I think can look a little messy once things are in them. Unfortunately, when I got it home I saw that the dark wood grain was hiding some flaws.  There was some warping in the wood and some general gaping.  But I figured that was fine since I was going to paint it anyway.

After seeing some of the amazing things people do with spray paint I decided I'd rather try that then break out my waterborne enamel.  Benjamin Moore Impervo is my secret love.  Last year I painted all of the dark redwood trim in my 4,000 sq ft house with it, but enamel is a lot of work.   Spray paint was fast, but it doubled the cost of the project pretty much.  I'm not sure if it was the fault of the less then perfect condition of the wood or my spray paint inexperience, but I got some weird cracking on my second coat (I waited 24 hrs in between so it wasn't wet).  It ended up looking like I'd glazed parts of the finish which is really not me.  I considered sanding it and repainting but I'm lazy, as discussed earlier, and so I just let it be.

The trigger is nice, but it's only 12 oz which isn't much.  I'll try a different brand next time.

  First coat.  At the bottom you can see some of the gapping.

After another day of drying I taped off squares and painted them with chalkboard paint. I've never used chalkboard paint before although I've had this can for months now.  The consistency is a little weird.  It's thick and has the viscosity of watered down pudding.  It's latex based so when I dripped on my work table I was able to wipe it up easily which was nice.  I used a foam brush to keep brush strokes to a minimum.  Even with my careful application, the paint bled in the wood grain, seeping into some, but not all, of the grooves.  Uneven and not cute.  Again, not sure if my taping wasn't up to par or if the wood was just not meant to take it.  My sharp squares weren't too sharp.  I nearly gave up on the project at this point.  It wasn't turning out like I had figured in my head which is why there are no pictures.  I waited another day and then decided to try to salvage it.  I used a smaller brush and just painted bubbly circles over the bleeds.  Again, not me.  I wasn't feeling it at all. 

You can see some of the uneveness in the wood and the crackling in the paint in you look close, bottom right hand corner and middle at the top. 


You have to wait 3 days to condition the chalkboard surface (you just rub it with the side of a piece of chalk to build up dust- doing it I remembered seeing teachers in elementary school do this after their boards were washed once a year).  The result of the conditioning is what saved the whole thing for me!  So, tip for beginners:  chalkboard paint doesn't have half the charm without the chalk.  It made a huge difference in the feel of the piece.  The stark black and white was transformed into a well loved schoolhouse-inspired look that made the effort worthwhile.  It's not perfect, but it is exactly what I needed.  It's imperfection will just keep me from freaking out when it gets knocked over with a soccer ball.


Cost:  Took about 6 days to finish because of drying times.  $5 for the piece, $12.50 for the spray paint.  I already had the foam brush, chalkboard paint (and used very little of it) so I'd say, total was less then $20.  Will probably pay for itself in avoided library fines.

Verdict:  Cute! Useful! Book-a-rific!  I need to work on my spray paint skills and now have to come up with something to do with the rest of that chalkboard paint...

BONUS:  Here's a tip to make your local librarian happy-  pass the books across the desk and don't return them in the drop box if you possibly can.  Emptying those boxes is a pain in the ass, especially if you are already standing behind the circ desk with a bar code scanner in your hand.

Linkys!


Thursday, February 3, 2011

Happy Chinese New Year!

Yesterday at my kid's preschool they did a clean up for the new Chinese year (Go Rabbit!) which is a traditional way to prepare for the holiday.   They were super excited about it and ran around the house with dust rags furiously, though not exactly effectively, cleaning.  It was very cute.  So I decided to get in on the action...

Right now this is how I'm storing my sewing supplies:

I've put a moratorium on fabric purchases until I have a better way to store it.
 That's right.  They are corralled in a pack n'play in the guest bedroom.  If we were to have a guest (other then my sister, family doesn't count right?) I don't know what I'd do with it all.  It works for now, but it obviously is not a long term solution.  The sewing machine itself I made room for in my dining room sideboard.  It just barely fits!  Until I have a more permanent spot for sewing I do it on the dining room table anyway. 

Maria in hiding among the china. 

In an effort to make space for myself I forced open the door to our front closet.  Meet "The Green Room":  THE GREEN ROOM... OF DOOM!   


Although our house is large, and I would never complain about the size, it's major (incurable) flaw is the lack of a garage. Parking outside in California weather is not a hassle so the car isn't the problem.  It's all the other stuff!  This front closet must serve multiple purposes.  We store the vacuum here, holiday decorations, tools, old paper work, extension cords, seldom used kitchen appliances, shoes, raincoats, light bulbs, tote bags, etc.  Basically everything you'd store in a garage plus what you'd store in a regular closet... say, like fabric for sewing?  That would be nice.  Oh!  I also stuck a gun cabinet in there because I didn't want one in our bedroom which is where it was when we moved in. We don't have a basement or an attic either so storage space really is at a premium.  In fact, I have to store our emergency earthquake supplies in the shower stall of a downstairs bathroom. 

It's right next to the storage room, hence The Green Room moniker, I swear my whole house is not neon green.  And there are three other bathrooms to shower in so nobody is dirty either!  Stop jumping to conclusions!  I'll organize this one day, too. Maybe next Chinese New Year.

The Year of the Rabbit is off to a good start.  You can now walk INTO The Green Room and easily open and close the door.  I did not discover a spot for my sewing supplies, however.  The room is now more organized, but it is still packed.   Guess our guests will just have to suck it up for awhile until I can come up with someplace else for all my notions.  Where do people store all their sewing stuff??


Upcoming Projects: Not Yet Blogged

a rundown of what I've been up to: DIY wedding dress, "Back to School Night" decor, Flower Arranging for the Incomptent, more jam labels, a dog bed solution, paper embroidery, flying pig needlework, attempting to scrapbook, make your own board game kit, Link from Zelda costume, organinzing for homework, and how to build an afterschooling program!

how to declutter after a death... and how not to do it

what do you do with all your fat clothes? Make doll clothes!