Saturday, August 6, 2011

Other Crafts: Super Easy Lego Table & Doll Bed

Other Crafts!  These two were super simple and a hit with the kids.  These are what I like to call Weekday Projects- I can do them on a weekday afternoon, start to finish with little to no direction.

LEGO TABLE

My friend Holly, who is quite crafty herself, mentioned the existence of such a thing a couple of weeks ago and how expensive they could be.  So I got home and Googled it and found she was totally right.  Outrageously expensive.  $250 outrageous.  But, I also discovered a bunch of DIY Lego tables that looked awesome.  Really awesome.  Most of them required power tools and a whole bunch of space once it was complete to store it and I wasn't up for either of those.  I needed easy and small.  So I took matters into my own hands and made this in less then 15 minutes. 


I know better then to move blocks during construction so this photo is candid. It's a big surface with a small footprint.
Not difficult in the least.  I used museum putty (to avoid both math and glue) to secure the Lego base plates to the top of a Target Ikea "Lack" knock-off table and my son was THRILLED.  Big Mommy points for me!  The museum putty is really stuck in case it strikes you as flimsy.  The plates don't lift or move at all and if I ever wanted to I could remove them.  My word of advice is one that only became obvious once I started piecing the plates together- they need a bit of space between them, ever so slight, so that legos will fit across the plates evenly and lock like they are supposed to lock.  The best way to get the distance right is to attach a block across them as a guide while you're puttying up the plates.  Since my table was white and I used white museum putty you can't really see it between them- if you had a different color table you could always use clear museum gel instead. Or really commit and use glue.

if you look close you can see the slight, very necessary gap between the plates.

Cost:  $39.11 (each of the base plates were $6.53 which is really a form of Danish terrorism, right?)

Verdict:  Legos are the most amazing quiet time toy ever.  Should have made this a year ago.


DOLL BED

Abby has been wanting one forever but I couldn't find one that was the right size or that wasn't made of plastic or plywood.  Even those I did find were way too expensive.  $78 for a doll bed and blanket, plus tax and shipping?  And I have to put it together? I kept putting off buying her one.  So when I saw this bright green solid wood Ikea doll bed for $10 I snatched it right up. 


It was violently green.  Brain searing green.  Radioactive frog green.  GREEN-GREEN.  Like greener then my startling green bathroom.

A bit of spray paint (Krylon this time, seems to work as well as the Rust-o-leum for a small project and is cheaper) makes it pink.  I'm still not doing great at the spray painting.  I did go back and fix this because it was just too drippy for me. 

not cute


much better.
I then used an extra flat sheet from my daughters' linens to make a doll duvet set to match her room.  I took foam I was going to make a dog bed with to make a mattress and covered it with white cotton as a "sheet".


Cost:  $10 for the bed, $4.99 for the spray paint, everything else I had on hand already.  Took me probably an hour to paint, sew and stuff everything.  If you are curious you can buy the doll bed at Ikea un-painted for $20, no mattress

Verdict:  Super fun!  My daughter loves that it matches her bedding and I love that it didn't cost me a fortune and isn't plasticky.

Linkys:

Sewing Project: Custom Basket Liner

No real post to go along with this one- it is pretty straight forward. I had this old long basket which is a great shape, but was not IN great shape. So I lined it!


Used the same un-named fabric I used for the ironing board cover. Not sold on the ribbon bow, not really me, but it's fine. If I ever do it again I'll insert elastic I think and sew it closed. A bunch of mismatched baskets lined in the same fabric is a great way to get rid of them at a yard sale, I think. Somebody's grandma would buy them! I'm really not a basket kind of girl.


Perfect for protein shake mix and bars to grab running out the door. Much needed accesible storage for those since I'm going to lose ten more pounds before my birthday so I can at least turn 35 weighing what I did before I had kids. A small victory against the passage of Time. Time is such a jackass!


Only difficult part of this project was the math. I have serious difficulty not with numbers, but with seeing them in three dimensions. Width, length and height are not terribly esoteric concepts yet my mind gets confused. Hence all the arrows. Don't laugh! It worked.

Wednesday, July 20, 2011

Sewing Project: Space Shuttle Tribute Embroidery & Patch T-shirt

The last Space Shuttle mission is about to come to an end with Atlantis en route back to Earth and it brings on a not-unexpected or even unique wave of nostalgia given my age (I'll be 35 in a couple months). What can I say? I'm a Cold War kid and I love the stars.


I always thought I'd go see the space shuttle lift-off in Florida. You know, one day.  Unspecified future tense.  It is by all accounts a truly awe-inspiring thing to witness.  I wished for years that they'd reinstate the West Coast launch program from California, but they never did after Challenger.  This is not the place to get into the politics of funding the space program, but our nation's history of flinging humans off the planet in a dangerous (and yes, expensive) bid to understand the fundamentals of the universe and how it operates is something I'm happy to share with my children.  The space shuttle is cumbersome and outdated and needs to go, but I hope it is replaced with something just as innovative and iconic.  And one day, I swear, I will go watch it, whatever it is, hurl brave people into orbit or beyond. 

On to the sewing!  There is currently a print of a small piece of embroidery on Atlantis, (the original was too heavy if you can believe that) experiencing zero gravity right now-  it's by Texas artist and fellow craft blogger Rachel Hobson and earned its place through a contest sponsored by NASA and Etsy. 

Her blog is all kinds of fun, check it out.  I totally agree with her win, but the other entries were pretty damn amazing.
It is truly a great piece, the texture is incredible and the stitching is both intricate and simple.  It is needlework at its finest, I think.  If it were a painting it would be called painterly, in that you can see the evidence of the artist's hand at work.  I have no idea if there's a word for that in embroidery or not. But it is inspiring and beautiful.  My embroidery is far less artistic and way more juvenile in part because I made it for my kids.  The concept could easily be transformed into something more chic and sophisticated by ditching the shuttle entirely or removing the booster and flames, doing it entirely in black and white, putting each of the capsules and the collection of stars into their own mini hoops and adding considerable texture... it would actually be quite lovely with an entirely different execution, but this was for my son and he is five, so no subtlety here: 


In case you don't recognize them, which is likely since I drew them, that's the Space Shuttle and beneath it the Gemini, Mercury and Apollo capsules.  Each star represents a person who has died on a spaceflight.  There are 18, counting four Soviets, thirteen Americans and one Israeli.  5% of all humans that have EVER been launched into space have died doing it.  The occupational fatality rate for an astronaut, i.e. the percentage who die while on the job, in space or not, hovers right around 10%. To use that hated statistical mis-analogy of the imaginary meal:  if you have dinner with 10 astronauts one of them is going to die at work.  Go Science!

xkcd, the webcomic that would really hate that I didn't explain how the fatality incident rate for astronauts is skewed since TOTAL number of deaths have to be counted per astronaut- there are so few astronauts, there is no other way to do it.  After doing my own math I checked around the web and it seems people have come upon this problem before and either ignore it or call the whole calculation off.  The mortality rates for other professions (like firefighters, roofers or loggers) which can be calculated per 100.000 and on an annual basis are difficult to impossible to compare.  THAT SAID, generally speaking, being an astronaut is ~60% more deadly then any other profession over the last six decades, making it the deadliest job in the world by far.  Then again, I took a year of statistics 15 years ago and use a calculator to balance my checkbook.  So yeah.  You might want to ask someone else.  I can't believe I bothered doing all that math for my sewing blog.

Back to the sewing!  Sewing and the Space Shuttle have an intimate relationship.  The thermal blankets that keep it from disintegrating on re-entry were hand sewn with glass thread for the last two decades, mostly by women, using industrial Singer machines, one of which is from 1918 and originally was designed to sew saddles for horses. The blankets have to be perfectly tailored, obviously. NPR ran a great bit called "The Homemade Spaceship" back in 2006 which I found fascinating and then followed up just this week as these highly skilled seamstresses are about to be put out of work.  I don't think making slipcovers for couches is ever going to quite compare.

This is one of the thermal panels- it is made of woven silica fabric, woven glass fabric and silica thread and quilted by hand.  This one is from the National Air and Space Museum so you can see where it has been marked "scrap" with a red stamp.  Lots of awkward shapes to lay across the ship.  I had a hard time quilting a runner for my perfectly rectangular, flat dining room table.  With cotton.

And the patches!  NASA loves embroidered patches!  Here's a retrospective on some of the mission patches. Totally worth a look.  Most of them were designed by the astronauts themselves; some of them are better then others. I think the most successful ones are those that were designed with thread in mind, you can kind of tell when a design didn't quite translate to embroidery.  Each is unique and nearly all include their names which is a nice touch.  My favorites, purely based on design:
Apollo 13.  Lucky or Unlucky?  Great design, but the horses didn't quite make the transition to thread.  There are three horses, 1 each for Lovell, Swigert and Haise.  One of them was intended for Ken Mattingly- guess it was a good thing this patch didn't include the names since he was kicked off the mission two days before launch).

Final servicing of the Hubble space telescope in 2009. 

Insignia in patch form vs.

in emblem form:  the only insignia that I think looks GREAT as a patch and boring as an emblem.

I made this t-shirt for my son Henry.  Nothing too special, just patches, but he needed something since he didn't get a 4th of July dress:


Linkys!


Sunday, July 10, 2011

Sewing Project: Miss Independance Dresses & Caplets

Things have been crazypants around here, nothing but non-stop madness. I have been sewing though, if not blogging about it!  For the 4th of July I made three (3!) of these little dresses. I made them for my daughter and for her two younger cousins who are visiting for the month from Chicago.

I have no idea what she is doing with her hands here.

A yo-yo extravaganza of patriotism!

Addison was taking a nap and there is no way you wake a baby for anything as silly as a photo.
It is the same pattern from Sewing for Children that I used before. I did make some modifications. For one, I raised the arm holes so that they weren't so open on all the dresses. In the book the photos show it being worn over a shirt, but it was like 100 degrees here so that wasn't going to happen and I just felt the pattern, as is, was a little too bare. Even fully lined they were light enough for the weather so I'd recommend anyone making this as a dress, and not as a pinafore, raise the curve on the pattern by at least an inch and a half.
Modifying the arm holes is a must, I think.


The girls trying to escape into the shade.  Way too hot.
I made the bottom part 2" longer then the pattern for Abby since the Lilac & Lime version was short. I probably could have added 4". Her legs! It was like I hadn't changed it at all. I kept it the same as the pattern for little Ashland (just turned 3) and dropped an inch for Addison's who is almost 18 months. Pretty sure I'm the only one who could tell I made them different sizes.


The adobe building behind the girls was built in 1846 before California was even a state.  It was the coolest place on the property on the 4th of July.  Adobe brick is awesome. 

Instead of binding the bottoms I hemmed them (straight and everything!) and added ribbon and jumbo ric-rac. I'm not sure how the ribbon will wash up but it looks good for now. My sister-in-law Kim (who was a Textiles Business major!) did the yo-yo embellishments for me which was HUGE. The baby did manage to tear her yo-yos off.  She's sassy! I used ribbon instead of the fold and sew for the tie-straps which saved a lot of time. The girls never complained, but I'm not sure how comfortable it was on their shoulders.

Pretty straight.  I'm thrilled with that.

In addition to the dresses I made matching caplets. When I was kid it always got chilly at night and after the fireworks show my grandmother would serve us hot cocoa. Well, it never got cold enough for the girls to even consider wearing their capes and they were in bed pretty early, so not sure when they are ever going to wear these.


The caplets are navy corduroy with white fleece lining, bound with red quilt binding at the edge. The closure is hook and eye with a faux button. I did embroider "A"'s into the lining of each cape with variegated thread for the girls (Abigail, Ashland and Addison become quite the tongue twister when they are together) as a little something special. Ashland's "A" ended up on the inside of the right front instead of the outside edge which I didn't have time to fix. I'm still a little bummed about that. I have no idea when or if they will ever where these now anyway so I shouldn't be too upset. Still, she won't be able to flash her "A" as easily as the other girls.

Monday, June 20, 2011

Sewing Project: Lilac & Lime Summer Dress


With the fabric that was intended for Abby's Easter dress I've constructed this summery frock! It is so hot here this is a perfect little outfit. I used the "Toddler's Dress" pattern from Making Children's Clothes by Emma Hardy. It's on the front of the book for good reason! This dress is light, but still a fully lined "real" dress.


She had to prove to me she could dance in it and so wear it to Dance Camp today.
My sewing book shopping spree has abated only a bit, just this one in the last couple of months. Quick review of Making Children's Clothes: directions are pretty straightforward, photos are pretty and inspiring if not always helpful, and diagrams are better then average. I recommend for beginners like me who already have another book that teaches the basics. Cute designs all the way through, very modern, and the shoes (fleetingly) make me want to have another baby.
I skipped the ribbons on the bottom since I thought it would be too much with the thick binding and the ruffles.  How cute are those tiny shoes??
Though not an issue with this dress, nearly none of these books ever show you how the back of a garment is supposed to look which is annoying since that is usually where the closure, (button, zipper, etc.) is placed. It isn't spiral bound but lays open and flat once you break in the binding. My only real complaint is the pattern pieces. The front of the book boasts "25 stylish step-by-step sewing projects for 0-5 years, including full size paper patterns".  Here is a photo of the "full size paper patterns":

It's like a metro map:  take the green line to Piccadilly station, cut on the fold then transfer to the pink line...
Construction wasn't difficult once you got the pattern onto the fabric.  I made a couple of changes- I attached the ruffle to the lining so that it peeks out below the dress. I also attached the green quilt binding at the bottom of the dress vs. hemming and skipped the ribbon detail that is in the instructions.


Strap before the fold and iron...

...strap after. Tip for beginners: this is why a good iron and ironing board are so important. This would be hard to impossible without them. And yes, I need to work on my cutting too.
The yo-yo beribboned badge was fun to make! I got to break out my glue gun which hasn't seen any action in years. Not even sure why I purchased one in the first place.  The lime accent idea came from the fact that I didn't have any white buttons... but I did have green! Then I found the ric-rac and the binding. I really don't plan out these projects in advance like I should.

The back. 
Cost: Technically, I had everything on hand since it was intended for another project, but I'd wager this was about $12. That's probably a little high. I do have a lot of fabric left over. In time this took about 3-4 hours.

Verdict: In love with it! My best project I've completed so far in terms of my skill level in completing it. Could be a little longer, but my daughter has inhumanly long legs (doesn't get it from me!) and while I could adjust it so the shoulder ties were lower, she has a scar on her chest (open heart surgery) that I like to keep covered in the sun.  It wouldn't be hard to adjust the pattern to make it longer next time.

Linkys!:
Running with Glitter


Friday, June 17, 2011

Other Crafts: Library Book Box with Chalkboard Due Date

In blog news, finally customized my header and shifted around my template a bit.  It's awfully pink, isn't it?  But it feels happy and I like it for now.

On to those other crafts I really have no business doing!  I take the kids to the library pretty often which makes me a good mom.  However, I frequently return books late which makes me a bad library patron.  This character flaw persists despite the fact that I spent years working in libraries.  Blog confession:  I had to pay for a book I checked out from UC Berkeley- WHERE I WORKED- because I lost it.  See?  Bad library patron.  And awkward conversation with your boss. 

I want to instill the same love and respect for books and learning in my children that I have, but would prefer if they didn't inherit my poor return habits.  I also hate realizing I need to return the books and then having to tear apart the house in a frenzy (because they are late) trying to find them. I needed a spot to keep them all together and a reminder of when they are due.  So this is my solution:

No more misplaced or overdue library books!

It started life like this:

The wood looks pretty nice in this picture.  It is not.

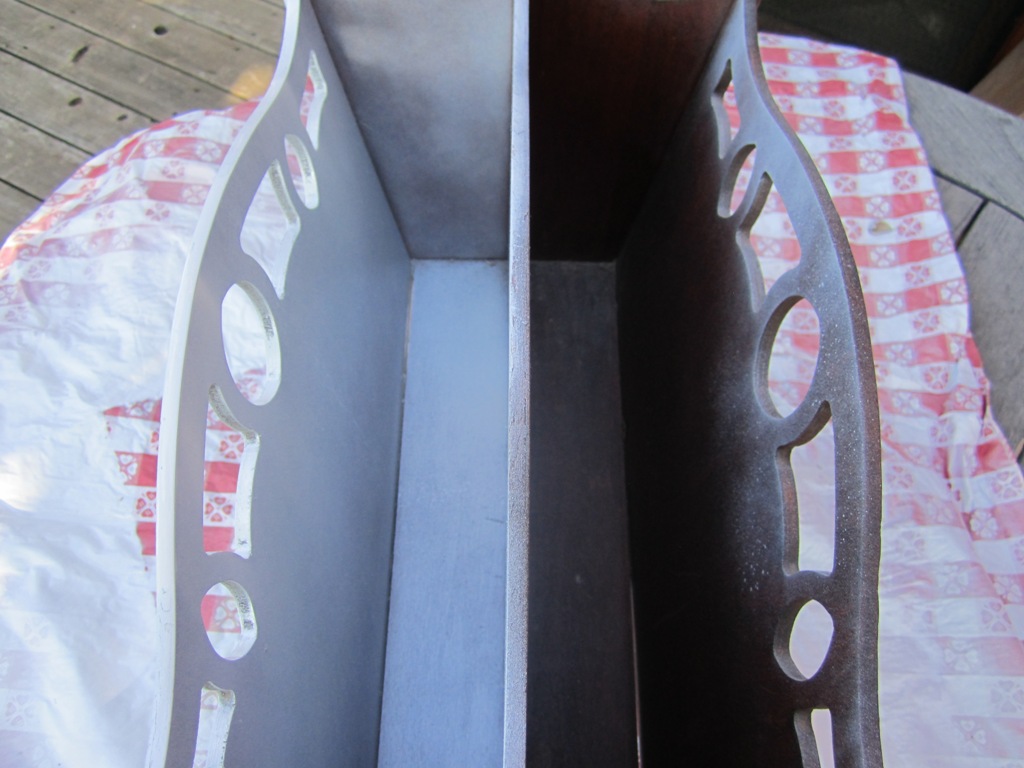
I bought the magazine rack at an antique shop in town. Thrift shops seem to be littered with them, they must have been a '70s household staple, but like ashtrays that also clutter up second-hand shops, nobody uses them anymore.  As a nation we've apparently quit smoking and canceled our magazine subscriptions.  I was able to talk the owner down to $5 by playing the "hey, I'm a local, possible return shopper and I've got cash" card.  Sometimes it is good to live in a tourist town.  I liked the shape of it, with the little cutouts and it seemed sturdy enough for books.  A lot of the other old magazine racks I'd found had slat sides which I think can look a little messy once things are in them. Unfortunately, when I got it home I saw that the dark wood grain was hiding some flaws.  There was some warping in the wood and some general gaping.  But I figured that was fine since I was going to paint it anyway.

After seeing some of the amazing things people do with spray paint I decided I'd rather try that then break out my waterborne enamel.  Benjamin Moore Impervo is my secret love.  Last year I painted all of the dark redwood trim in my 4,000 sq ft house with it, but enamel is a lot of work.   Spray paint was fast, but it doubled the cost of the project pretty much.  I'm not sure if it was the fault of the less then perfect condition of the wood or my spray paint inexperience, but I got some weird cracking on my second coat (I waited 24 hrs in between so it wasn't wet).  It ended up looking like I'd glazed parts of the finish which is really not me.  I considered sanding it and repainting but I'm lazy, as discussed earlier, and so I just let it be.

The trigger is nice, but it's only 12 oz which isn't much.  I'll try a different brand next time.

  First coat.  At the bottom you can see some of the gapping.

After another day of drying I taped off squares and painted them with chalkboard paint. I've never used chalkboard paint before although I've had this can for months now.  The consistency is a little weird.  It's thick and has the viscosity of watered down pudding.  It's latex based so when I dripped on my work table I was able to wipe it up easily which was nice.  I used a foam brush to keep brush strokes to a minimum.  Even with my careful application, the paint bled in the wood grain, seeping into some, but not all, of the grooves.  Uneven and not cute.  Again, not sure if my taping wasn't up to par or if the wood was just not meant to take it.  My sharp squares weren't too sharp.  I nearly gave up on the project at this point.  It wasn't turning out like I had figured in my head which is why there are no pictures.  I waited another day and then decided to try to salvage it.  I used a smaller brush and just painted bubbly circles over the bleeds.  Again, not me.  I wasn't feeling it at all. 

You can see some of the uneveness in the wood and the crackling in the paint in you look close, bottom right hand corner and middle at the top. 


You have to wait 3 days to condition the chalkboard surface (you just rub it with the side of a piece of chalk to build up dust- doing it I remembered seeing teachers in elementary school do this after their boards were washed once a year).  The result of the conditioning is what saved the whole thing for me!  So, tip for beginners:  chalkboard paint doesn't have half the charm without the chalk.  It made a huge difference in the feel of the piece.  The stark black and white was transformed into a well loved schoolhouse-inspired look that made the effort worthwhile.  It's not perfect, but it is exactly what I needed.  It's imperfection will just keep me from freaking out when it gets knocked over with a soccer ball.


Cost:  Took about 6 days to finish because of drying times.  $5 for the piece, $12.50 for the spray paint.  I already had the foam brush, chalkboard paint (and used very little of it) so I'd say, total was less then $20.  Will probably pay for itself in avoided library fines.

Verdict:  Cute! Useful! Book-a-rific!  I need to work on my spray paint skills and now have to come up with something to do with the rest of that chalkboard paint...

BONUS:  Here's a tip to make your local librarian happy-  pass the books across the desk and don't return them in the drop box if you possibly can.  Emptying those boxes is a pain in the ass, especially if you are already standing behind the circ desk with a bar code scanner in your hand.

Linkys!


Upcoming Projects: Not Yet Blogged

a rundown of what I've been up to: DIY wedding dress, "Back to School Night" decor, Flower Arranging for the Incomptent, more jam labels, a dog bed solution, paper embroidery, flying pig needlework, attempting to scrapbook, make your own board game kit, Link from Zelda costume, organinzing for homework, and how to build an afterschooling program!

how to declutter after a death... and how not to do it

what do you do with all your fat clothes? Make doll clothes!