Sunday, January 30, 2011

Sewing Project: Valentine's Day Chair Backers

I always loved the idea of the holiday chair backpack/mailbox.  I'd eye them in the endless supply of PB Kids catalogs sent to me, but they were always too expensive when you add in tax and shipping and personalization.  A $12 item suddenly costs $38.  Times two, of course, because I have two kids.  So when I saw this post over on At Second Street, I was super excited.  "Hey!  I own a sewing machine now!  I can totally do this!"

I love everything about this ad.  Look how perfectly everything coordinates!  Don't you love how none of the baskets are overflowing?  How none of the chalk labels are rubbed off?  How clean those chairs are? That rug has not a single stain!
 
After inspecting all the variations I went with the chair back tutorial on Our Scoop which was great in that it is PDF format.  I print these and file them neatly in labeled manila folders,  (I know!  Super organized, right??), and PDFs print so much neater then straight from the web stuff.  I'm always super grateful for online tutorials which are free and a ton of effort on the part of the creator.  So thanks!  Probably due to my complete inexperience I had a couple of problems with these directions though... I eventually figured out how to sew the bottom and sides to the front and back by ignoring the directions and thinking of them as tiny cubes like the ottoman slipcovers I made.  I never could figure out how to do the rickrack properly.  How in the world does it end up on the outside when you sew the two pieces right sides together...whatever, I couldn't sort it and my rickrack isn't nearly as cute since it's all on top.  I'm going to work on figuring this out at some point.

Following directions, word for word.  Until I get confuzzled.


Low light is a friend to wise women and beginner's sewing projects.


I did the second one a bit differently because I only had two buttons left, but they look cute together.  The letters are all whip-stitched on by hand with pink to go with the pink rickrack. 

The biggest obstacle for me was the button holes.  I've (clearly) never done it before and it took me a lot of trial and error and plenty of Googling and curse words to figure it out, but now that I know how it is done, it is not difficult at all.  I intend to make button holes on everything from now on, whether buttons are called for or not.

Notes on the project:
-these aren't especially easy.  The first one took me forever.  Hours and hours, literally.  Figuring out the buttons was a huge pit of time suckage.  The second one went faster as far as sewing goes, but all the hand stitching took awhile. 

-interfacing is key to keep the square shape.  Some of the other tutorials have more of a pouch and less of a boxy look, but I liked the structure.  It comes as at a price though: that ironing takes time too.

-the red duck cloth I used I thought would be great for durability but the straps on the back are kind of fraying at the edges, felt might have been a better choice.

-I wish I'd used a more contrasting fabric for the second one's cut out and applique work.  The red with large white polka dots just don't stand out as much. The reverse (red on white) would have looked better.

-I tried to top stitch in white around the heart cut out on the first one and it didn't turn out.  I ripped it out.  The edge is a little too raw for my personal taste without it.  I just learned about finger pressing yesterday and wish I'd known about it when working on these. 

-a tip for beginners:  After I finished the first one it occurred to me that the only chairs in my house these could attach to are the kids playroom chairs so make sure you have chairs with back slats somewhere before you do this project.  Duh!

-cost was pretty low in terms of dollars.  The fabric for the outside and the lining were both on sale, about $4/yard I think.  I might do a tutorial on how to read a Joann's receipt.  The Dritz button kits were $2.50-ish and I bought two, plus the thread, rickrack and interfacing (on sale, too) brought the total up to about $18 for the two chair backers.  In time, these took me close to nine hours, almost all of which was spent on the first one.

Verdict:  Cute!  Learned how to do buttons so that was huge and "saved" about $30.   Now of course I have to fill them with lovely little notes and gifts... I should have included that in the cost.

Sewing Project: Boy's Scarf with Monogram

I was feeling fiesty and made this without a pattern.  It isn't perfect, but it is warm and my son loves it!  It is just a long rectangle afterall.  I'm not going to bother detailing how I made it.


He wanted something since his sister was getting all my castoff mistakes...

Green is his favorite color.  You might recognize that strip of yellow from the ottomon covers. The end of the scarf tucks in behind it. The leaf fabric is from Joann's where one of the staff members clearly disapproved of my choice in fabric and said, twice, "Wow.  That is busy."  I just laughed at her and said, "I'm not afraid of pattern."  Given her fresh ensemble of khakis, nurse shoes and polo shirt I wasn't going to give her fashion opinions too much weight...

Thursday, January 27, 2011

Sewing Project: Playroom Ottoman Slipcovers

When moving into this house I intended to have the house re-wired so that we'd have a home without the standard family room and (often unused) formal living room, but rather a playroom (without a tv) and a more adult living room/tv space. 

That never happened.  The re-wiring would require lots of money and someone brave enough to crawl under the house so instead I've defaulted into a family room filled with toys that we call a playroom and a formal living room that I force everyone to use so as to not waste the square footage and better natural light.  The point I'm trying to make is that the playroom became the default spot, a place where 'useful'  and 'comfortable' far outweigh 'attractive' or even 'mildly appealing'.  Enter the ottomans:


These are in much better shape then mine.  No before pics because they were that gross.

These are them, in an image stolen from whence I purchased them, Overstock.com.  They are cubes of stiff foam that you can sit on if needed and can kick and flip around with your feet for optimal lounging comfort.  In our old home the dark sage green matched well with the decor in our great room.  In this house,where we inherited a lot of furniture and other pieces, including the rug in the playroom, they don't go at all.  Their constant use for snacking and grubby kid handling have also made them dirty beyond the help of even Resolve Foam Cleanser.   


So I slipcovered them!

Yellow!  Happy!


Top stitching detail. 


Henry approved!

Thanks to this great, simple tutorial on Sew Much Ado I was able to whip out the first one in an evening and the second took me a little more then an hour.  What a huge difference.  They are now bright and sunny and not gross and worn. 

Notes on the project:
-the project was easy.  Seriously.  Be not afraid of the simple slipcover.

-the hardest part was the measuring.  Since my ottomans are foam based and old the edges aren't exactly sharp, more rounded, but not evenly.

-I didn't want to topstich the seams and had to talk myself into following the tutorial exactly.  Very glad I did.  It isn't that noticeable, but it makes the project look finished in a way that it wouldn't without that step.

-I Velcroed mine to the bottom so I could take them off and wash them as needed.  I might need to add some more Velcro- I had just done the corners, but it's been a week and the covers are shifting a bit more then I like.  We'll see.

-Seriously want to slipcover the couches in the playroom now...

-Cost was $4.99/yard for the yellow duck cloth on sale. I used about a yard and quarter.  The Velcro I had on hand, but had to buy thread to match in that same bright shade.  Total: $6.90-ish, plus about three hours.

Verdict:  Love them!  I made something useful and attractive.  Made me want to kiss my sewing machine. 

Sewing Project: Tokyo Tie Bag, aka, The Handbag from Hell

This cute, small handbag killed me.  I made it three times. 

The first time I got all the way through it and realized, hey, I never turned this inside out!  You could see everything and there were no seams just top stitching essentially. Plus, I sewed it so the seam that is supposed to run up the middle instead ran up the side which made the bag all wonky.  Wasted some lovely Robert Kaufman fabric.  I will use the rest of on something awesome soon to make up for it. 


Richer in person, this is Joyce McAdams for Robert Kaufman.  Pattern is called "Antique" and is for the Oriental Traditions 8 collection.  Fabric design is fascinating, yet the two fabric designers I've known in real life were both crazypants.

The second time I got all the way through it and realized, hey, it wasn't that I never turned the first one, but that I'm making some sort of grave mistake way earlier then that...because this bag, while properly seamed, was still stitched on the wrong side.  Gumdrops! 

The third time I gave up on the directions I was using in the Sew Everything Workshop (despite my failure here, still a great resource) and hit the web.  That's when I came to Darling Petunia's detailed and fully photographed tutorial for a larger version.  THANK GOD.  Following her directions and using some cheaper Walmart fabric, I was able to figure out that I wasn't sewing the pieces right sides together (rookie mistake, I know) and that I was jacking things up in general.  I am forever indebted to her blog for this save, so check it out.  She has lots of cute projects and a shared passion for plastic Rubbermaid bins so I know she's good people.


Tiny.  More like a large pocket you carry with you.


I'm not sold on the tie as a cute design element.  YMMV.


French seams!  I'm learning!

Notes on the project: 
-this bag is too small to carry anything if you use the measurements in the book.  Make something you'll use and do the bag with Darling Petunia's enlarged directions.  This one is yet another bag for my daughter.  Thank god she's easily pleased.

-French seams are awesome, however if you ever want to incorporate them into your own patterns remember to account for them when determining the measurements as they suck up fabric.

-if you can't figure it out the second time, don't despair, just Google.  Chances are someone else has already sorted it out for you. 

-a better person then me would use cheap fabric every time they sew something new, but I can't do that.  Part of the fun of sewing is all the beautiful fabrics and I'm not going to guard them like precious objects.  It is fabric. Its entire purpose is to be used to make things.  I'm just helping it to fulfill it's destiny, even if I do it poorly.  Right?

-I used Velcro instead of a snap when I realized how small it was and how unlikely I was to use it myself, but if you intend to put stuff in yours I'd use a snap or the button tab that is recommended elsewhere just to make sure nothing falls out.

-Cost for the two failed bags and the one success was probably $6-8 and something ridiculous like 6 hours.

Verdict:  End result was not worth the effort, but the process of making it was good practice.

Sunday, January 23, 2011

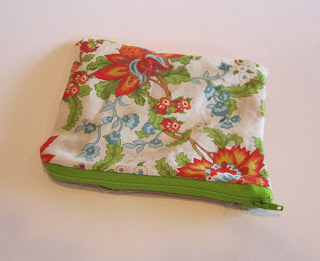
Sewing Project: Zippered bags #1-3

I should apologize for the quality of the photos, up to this point most of these were taken with my phone (HTC Evo rules my heart) in order to message my accomplishments/absolute failures.  Going forward I'm going to do my best to get progress shots as well as clearer photos in general with an actual camera.

Zippers!  They don't scare me as much as buttons, but I was apprehensive.  I still am not entirely sure I'm using the zipper foot correctly.  It was good practice to switch out the feet (super easy) and really examine the accessories that came with my machine.  I do need to come up with a better name then "Maria".

Zipper bag #1

Pretty fabric!  I think it was like $8/yard so I only got one.

Missing the zipper entirely is not good for structure.

In the end it is pretty small, too.  More like an oversized change purse.
 Notes on the project:  I screwed up my first zipper bag, somehow having the the lining on the outside on half, which actually would have been cute if that had been my intention.  Also, I missed the zipper at a couple of points which I didn't notice until I was finished.  Boo for holes.  The patterned fabric I really liked and don't have much of so I was bummed this didn't turn out.  The corduroy I love like always.  Cost:  ~$4 and close to two hours.

Verdict:  Zipper sneak attack results in unusable bag.

Zipper bag #2


Notes on the project:  This fabric was seriously cheap.  Purchased at Walmart for $1, the ironing took awhile to get the creases out, but it was good to practice with since if I screwed it up it wasn't much of a loss.  


Success!  Lining on the inside this time and no holes.  The stitching on either side of the zipper teeth isn't totally even, but it is hard to tell unless you look super close.  The earlier lining issue was due to some unclear (at least to me) directions in the "Zippered Kit Bag" pattern in The New Handmade, but I was able to correct myself here.  Tip for beginners like me:  I've been making notes in all the sewing books- instructions to myself, bits of clarity that I know will help the next time I try it.  I make notes all over cookbooks too which drives my husband crazy.  Cost: less then $2 and about an hour.

Verdict:  Zipper-Rebecca cease fire signed.

Zipper bag #3


Notes on the project:  Love this fabric, didn't realize until I got it home that it was Amy Butler, but I should have guessed.  The combo with the pink zipper and yellow lining made me very happy.  I did this while walking my sister through the pattern "Picasso Pencil Bag" in The New Handmade which is a bit bigger then the kit bag and uses a 9 inch zipper, plus has this oblong shape to it where it is wider at the bottom.  It was Anna's very first machine sewing project and we might have aimed a little high.  I need a photo of hers to post too.  Email me one, Anna!

My zipper is a little uneven again, the seam a little closer to the teeth on one side then the other, but the real problem was down at the bottom corners.  The directions on how to shape them were not clear  and I kind of winged it to less then stellar results.  They kind of look like elf-shoe corners when they are supposed to be softly rounded.  If I feel up to it I might turn it wrong side out again and see what I can do, but don't have the motivation right now.   This is the problem doing projects just to learn and not because I want them- if they don't turn out, I'm under no pressure to fix them or do them again.  That said I feel like I could probably make a zipper bag like this without a pattern now and know that zippers, while difficult, are not my enemy.  Cost: ~$4 and two hours.

Verdict:  peace reached with zippers, for now.  Corners are the new communists.

Tuesday, January 18, 2011

Sewing Project: Embellished Tote Bag


With my mad tote bag making skillz I decided to mess with the pattern a bit and made this for my daughter.  It is considerably larger and has grosgrain ribbon handles which saved me from the difficulty of the fold and sew. 

Pink and red are her favorite colors.  Compared to my canvas tote this thing was a steal.  The awesome corduroy was only $1.50/yard on clearance.  The pink is a light denim, on sale for $6.99/yard and the cherry pattern lining was $4.19 and I have plenty left over of all of them. 

I always see people doing cool things with felt so I bought some and then had no idea what to make, so monogrammed the bag with it.  The heat 'n bond doesn't work on felt and/or I did something stupid.  In any case, I practiced my "pivoting" where you turn the fabric while stitching to outline the "A" with pink thread.   Embroidering it on would probably have been cuter with a thicker, more noticeable thread, but it was good practice to use the machine. 

Notes on the project:
-the heart buttons were an afterthought.  If I'd been smart I would have sewn them on before I put the bag together so that the lining would have covered the back stitches.  You have to look pretty close to see them inside anyway so not a big deal. 

-fourth time is the charm, I finished this tote quickly and didn't make any major mistakes.

-the ribbon handles worked fine for me since the most this bag will hold is stuffed animals, but I don't think they'd stand up to a really heavy load, but maybe.  No promises!

-materials cost me about $5.75 and the project took two hours.

Verdict:  Tote bags for everyone!

Monday, January 17, 2011

Sewing Project: Reading List Tote #1-3

This project is from "The New Handmade" and I chose it because it was rated a "one flower" skill level project and, well, I like tote bags.  Look, I have two small kids and they have a lot of crap.  Now that it's not diapers and bottles, but tap shoes and Star Wars figures I'm not limited to things that can be easily wiped down or that are insulated to keep milk from spoiling and I've kind of gone crazy with the tote bags.

Anyway, back to the project.  Since this was my first sewing machine project I took the advice of a different author and used muslin the first time.  It's cheap, like $1/yard, and I'm glad I did.  I just wrote with ballpoint pen which pieces were which from the instructions since they were all the same color.


Biggest problem:  I can't cut straight!  I measured out the fabric and cut it on a cutting mat with a rotary cutter which I was led to believe would make it easier (it's not).  Not wanting to waste the whole $0.10 of muslin I was using (WTF is wrong with me? I should have just started over), I just subtracted 2 inches from the pattern directions after I jacked up the cutting a few times.  So instead of a bag that was supposed to be 11" X 15" , I got a tote that was 9" X 13" which is the perfect size for... a can of soda and a matchbook?  It is small. 


Notes on the project (#1):
-muslin is cheap, let's not be stingy

-um, remember to remove the paper from the interfacing or your tote will be crinkly sounding like your bag is really for potato chips. Not that I would ever do something so foolish and silly...

-the directions are very clear that you should be ironing.  Do it.  Just suck it up and do it.

-I added the strip of Target $1 ribbon across the front seam just to add some color before I gave it to my daughter, (she was super excited about this bag, btw).  I used a strip of heat 'n bond that I had on hand but had never used.  It isn't sewn on.  Way too thin. 

-seriously hard time with the handles.  My ability to sew straight at an 1/8" is not so hot.  If you're doing this project as a beginner just make the handles wider so that the fold under is easier to catch if you don't sew perfectly straight.

Verdict:  Pretty pleased with myself.  Took longer then I expected, but was psyched to start the "real" tote bag.

Notes on the project (#2): (no photos, for reason that will become obvious)
-not having time to poke around the fabric store I just asked where the canvas was and picked out the colors I wanted for the tote.  $19.99/yard folks!  Having no idea that was seriously expensive I paid it and went on my foolish way.

-feeling bad for not ironing the muslin, I ironed the canvas.  Or tried until it melted onto my iron.  Apparently it wasn't cotton canvas.  Luckily enough it just peeled off the next day in one big plastic piece.

-canvas sewn to canvas lined with canvas is THICK.  Thick enough that I somehow didn't notice that I sewed the bag closed.

Verdict:  TOTAL DISASTER.  To sum up this tote's lessons remember not to sew the bag closed, don't iron plastic and don't pay $20 a yard for fabric when you can't sew.


Notes on the project (#3):
-if you screw something up royally, take a break.  I took a day before I started over and had a fresh attitude.

-I made the handles wider to make it easier on myself.  It doesn't look too off and I saved myself the heartache.

-ditched the rotary cutter.  I used new expensive sewing shears and they were awesome. 

-ditched the interfacing because the fabric I was using was so stiff anyway.

-this thing is sturdy and I'm now using it everyday.  I stick my purse, my water bottle and my phone in there and there is still a bit of room for papers or whatnot.  I like it because it isn't so big that I can leave a bunch of crap in it, I have to empty it out regularly.

Verdict:  Success!  Great pattern, easy to follow directions (so long as you follow them) and a useful, attractive item.  I feel like I can sew anything!  You know, after I fail at it a few times.  Anything!

Sunday, January 16, 2011

Sewing How To Books: Three short reviews

I'm a reader.  That's just who I am.  The day after Christmas I jumped on Amazon and started going through the sewing how to books to choose a couple.  These are the three I bought, in order of most helpful to a true beginner like me:


Sew Everything Workshop: The Complete Step-by-Step Beginner's Guide
This book is great.  Truly.  The first section, before you get to the projects, is a beginner's goldmine.  There were step by step instructions with color photos of how to wind the bobbin, how to thread the needle, the names of all the parts of the machine, common items you should have on hand, how to pin so it's easy to pull them out as you sew, as well as more advanced stuff I haven't even gotten to yet like how to read a commerical pattern, how to alter store bought clothes, etc.  She names names and by that I mean brand names which as a consumer I appreciate.  If Gutterman is a quality thread brand, tell me!  I need to know so I don't buy something lame that will make my projects harder then they need to be. 

Her advice is practical, like: buy a flat seam ripper because 1) you will need it and 2) if it's round it'll roll off the table.  Her tone is light which makes sewing seem fun and exciting and not a serious and difficult skill you will never master.  She preaches against perfectionism but encourages good preparation and concientious habits by invoking Martha Stewart which I find highly amusing as does she, apparently.   I highly recommed this book even without the projects and patterns that are included.  Bonus!  It is spiral bound so it lies flat if you are following directions word for word.

I took a lot of the advice in this book to heart.  My first shopping trip to the sewing store included a list made from her section on essential tools and so far I've used every single one of them. 


The New Handmade:  Simple Sewing for Contemporary Style
This is also a great book and I think it is a good compliment to the "Sew Everything Workshop".  Her intro to sewing is a lot shorter and doesn't include the same step by step instuctions or instuctional photographs, but her tone is brisk and she too will name names.  The photos of the finished projects in this book are inspiring for someone like me who really isn't into folksy country crap and who isn't looking to make heirloom quilts for the county fair homemakers' pavillion, although she does have a quilt project in there.  Her fabric choices are modern and fun.  She isn't afraid of pattern or color. 

I really like the way the projects are laid out as far as materials needed and the explanation of pre-sewing tasks which I've learned take up the majority of the time: cutting, pinning, measuring, etc. are all much more consuming then actually sitting at the machine.  The best thing about "The New Handmade" is that each project is rated for difficulty so I know as cute as the book cover organizer thing looks I'm not ready to try it quite yet.  That said, I'm the kind of person who likes to jump in and see how things go so my first project wasn't a simple pillow cover or a pot holder but a lined tote bag from this book.


Sew & Stow: 31 Fun Sewing Projects to Carry, Hold, and Organize Your Stuff, Your Home, and Yourself!
I like buckets.  I like storage.  A lot.  If it is cute and promises to make me more efficent I'm probably going to buy it. The Container Store makes me want to lose myself in its plastic, organized utopia forever.  This book played right into that. 

It is not for beginners.  Some of the reviews on Amazon say it is, but no.  At least not if you are like me and don't have someone in the next room you can call for help.  If you are a teenager living at home and your mom has been sewing for 30 years, okay...  this book could work for you.  Nearly none of these projects seem geared toward someone who can barely sew straight like me, let's put it that way.  They look challenging.  There's a lot of materials like cardboard and foam and things that I'd have to search out to find and I imagine might not be cheap. That said the projects do look fun and flipping through it I hope that one day I can make awesome things like... fabric boxes?  I'm not sure what I'll make from this book.  But it is pretty.  The number one drawback is probably not the fault of the author, but the publisher.  All the cool, inspiring color photos of the projects are all stacked together at the beginning of the book which I know is probably due to cost, but who wants to flip back and forth like that?

"Sew & Stow" is going to go to be filed under "aspirational sewing" until later.  Probably much later.

Verdict:  These three books cost me about $46 total.  No shipping or tax because Amazon loves me. The first two were totally worth it and the third, well, I learned what to look for in the future, i.e. projects I can actually make at my current skill level and not just dream about making and a good layout inside.

The Sewing Machine: A Babylock "Maria" Christmas Surprise

During our stuffed animal marathon I commented several times that "Wow, this would be way easier with a sewing machine" and each time my husband shook his head and said, "No way.  You'd never use it."

My sister must have filed that away because she and my mom surprised me with this awesome gift come Christmas morning....

This blog is just a big thank you note to them and an equally big "see-I-am-too-using-it!" to my husband. 

It is a Babylock "Maria" which is a brand I have heard good things about from craftier friends.  Maria a pretty basic model, but not the most basic.  It is mechanical, not electronic and has a standard bobbin instead of a drop-in which I was concerned about at first (once I heard there was a difference) but has proven to be a non-issue.  I love it!  It is uncomplicated but sturdy and all the "engine" parts are metal which is supposedly important for longevity. 

Here's the thing though... I've never used a sewing machine before.  Like, I've literally never touched one in my 34 years.  My mom did a bit of sewing off and on when I was younger but she was constantly fighting with her machine (an ancient off-white Singer) and I stayed far away from that cursed object.  I didn't know what a bobbin even was until a three weeks ago, let alone how to thread one. 

The manual that came with "Maria" kind of sucks.  The images are not instructive and consist of line drawings.  Babylock clearly intends for you to take a class at the their dealers which in my case is 40 minutes away and only on Sundays or something and I'm not that patient.  So instead I hit up YouTube!  God, I love the Internet.


Okay, this video is waaaaay too fast and her hand gets in the way of what she's doing a couple of times but it gave me a sense of what I was supposed to be doing when threading the machine.  So thanks random stranger!  I watched this roughly 30 times.  She has another video of winding the bobbin which was also helpful.  Did you know a sewing machine has thread coming from the top and from the bottom and that's how it stitches stuff together?  Yeah, well, shut up.  I didn't know it.  I guess I never thought about the logistics of machine sewing before.

Sidenote:  If you have a device of some sort and don't know what you're doing I highly recommend YouTube.  This is also how I learned to use my flat iron years ago.  I don't know why more manufacturers don't exploit YouTube as a customer service tool.

Verdict:  I think anything fancier would have been wasted on me.  Embroidery?  Please.  Let's concentrate on straight seams and just learning the jargon.  All in all, so far, I'm very pleased with my little machine.  She's my partner in fabric crime and we will soon rule the craft underworld together!  I am totally changing her name though because "Maria" is not nearly badass enough.

Saturday, January 15, 2011

No Machine Sewing Project: Fernando the Bunny Stuffed Animal

We might have been a little punchy after 6 hours of sewing, but my sister and I decided that we could do this sewing thing all the time!  We could turn out stuffed animals everyday!  We'd make awesome gifts for friends and family!  We'd be the queens of stuffed animals!  Emboldened by our small kitty bat success, I decided to make my daughter a bunny that same night.

I made my own pattern, based loosely on the one I'd just used.  To make the pattern I took a piece of standard size construction paper, folded it in half and sketched the outline of half a bunny (like you probably did as a kid making paper hearts).  I then sketched around it about an inch for cutting line, using the original sketched line as the sewing line.   I cut it out on the fold and presto!

Meet FERNANDO the BUNNY!


Yes.  He is pink.  And named Fernando.  Don't hate!

Yeah, he didn't turn out so well.   

Honestly, he looked better at first.  I swear!  But he's had some accidents and has had more then a few emergency hole closing surgeries.  His head in particular has not fared well.  I also got a little lazy on some of surgeries and patched him up haphazardly. Plus, I didn't have any pink thread.

Here's the thing, I chose the wrong materials.  His front here is made from a toddler's stretchy knit sweater which isn't very stable, it wanted to unravel as soon as I cut it.  The back is a soft, thin corduroy which I think would have worked better without the pinto beans stressing the stitches, but even it wasn't really a good choice.  (The tail is a ruffle from the sweater twisted on itself).  Stuffed animals need to be soft, but they need some structure too.  In any event, the pinto beans which had worked so great for our first project failed here.  Fernando needed soft cotton fluff. Beans have escaped on many occasions from where the sweater material has pulled away from the seams. The holes make him a hazard around my two preschoolers.  They aren't likely to try to eat them or anything but they aren't above making a huge mess if given hundreds of beans. 


Evidence of his many fixed holes and an escaped pinto.  Poor Fernando!


Notes on the project:
-pattern making for a simple shape like this is not hard at all.  I encourage everyone to try doing it for themselves.  Just make sure there isn't too much detail, for instance the puffing out at his cheeks didn't show up at all in the final project because I didn't stitch straight enough. 

-again, cut the corners.  I turned him wrong side out a couple of times and "graded the seams" although I had no idea that's what I was doing at the time, in order for his arms and legs to have better definition by trimming away the extra material along the stitches.

-without the right fabrics, don't even bother, it'll be more hassle then it is worth. 

-don't sew when you are tired.  My hands were sore from hand sewing the kitty bat and it showed here. My stitch length was way wider and I'm sure that's part of the reason for all the seam weakness and lost beans.

-cost was $0 and about 3-4 hours. Materials were all recycled. 

Verdict:  Fernando the Bunny might be renamed Fernando the Learning Experience.  Not pleased with how he turned out in the end, but hey, he was only the second thing I'd ever sewn like this and he is kind of cute in a Frankenstein kind of way...  my daughter loved him even if she didn't get to play with him much.

No Machine Sewing Project: Kitty Bat Stuffed Animal

Back in November my younger sister and I shooed my kids outside and decided, for reasons I'm not entirely certain of, to make stuffed animals.  It was something neither of us had ever attempted before.

We were bored?  I don't know.  I had seen a tutorial on the Storque's How to Tuesday weeks earlier and it seemed easy enough!  Better then watching tv, right?  Well, SIX HOURS later we had this guy.  Entirely handmade and stitched from old footie-jammies destined for Goodwill.


Now, yes, technically he is supposed to be a cat, but he turned out more like a bat.  My sister's did too, so I think it's just the way he's supposed to be.  We skipped the optional tail which might be part of his confused identity.  We filled him with pinto beans too since it's not like I had cotton stuffing sitting around.  Those changes aside, the pattern was easy to follow and, despite the time suck, it was fun. I happened to have the beans in the pantry and the needles and embroidery thread from long abandoned cross-stitching kits so the cost here was $0 (not counting my time which makes this the world's most expensive stuffed animal ever).  The eyes were buttons from another Goodwill item.


Notes on the project: 
- do clip the corners, it makes a huge difference.  You can see some puckering at his arms and crotch area if you look.  I didn't do enough clipping in those areas.

- find directions online on how to do an invisible stitch in order to close him up once he's right side out and stuffed.  You can't quite tell from this photo, but my stitches across his head are not so invisible.

-using ribbon my sister had on hand from the $1 section of Target I gave him a little scarf that I glued on with crazy glue, hoping to make him look less like a green bat.  Not sure if it was necessary.

-I free-handed the circles for the eyes.  Don't.  Trace something like it tells you to do.

-he's small.  The pattern looks a decent size, but take away the cutting and sewing allowance and there's not much left.

Verdict:  He's cute!  My 4 year old son claimed him as his "buddy" that night.  Which put my three year old in a tizzy because she wanted an animal too.  Which is where Fernando comes in...

Upcoming Projects: Not Yet Blogged

a rundown of what I've been up to: DIY wedding dress, "Back to School Night" decor, Flower Arranging for the Incomptent, more jam labels, a dog bed solution, paper embroidery, flying pig needlework, attempting to scrapbook, make your own board game kit, Link from Zelda costume, organinzing for homework, and how to build an afterschooling program!

how to declutter after a death... and how not to do it

what do you do with all your fat clothes? Make doll clothes!