Showing posts sorted by relevance for query library books. Sort by date Show all posts

Friday, June 17, 2011

Other Crafts: Library Book Box with Chalkboard Due Date

In blog news, finally customized my header and shifted around my template a bit.  It's awfully pink, isn't it?  But it feels happy and I like it for now.

On to those other crafts I really have no business doing!  I take the kids to the library pretty often which makes me a good mom.  However, I frequently return books late which makes me a bad library patron.  This character flaw persists despite the fact that I spent years working in libraries.  Blog confession:  I had to pay for a book I checked out from UC Berkeley- WHERE I WORKED- because I lost it.  See?  Bad library patron.  And awkward conversation with your boss. 

I want to instill the same love and respect for books and learning in my children that I have, but would prefer if they didn't inherit my poor return habits.  I also hate realizing I need to return the books and then having to tear apart the house in a frenzy (because they are late) trying to find them. I needed a spot to keep them all together and a reminder of when they are due.  So this is my solution:

No more misplaced or overdue library books!

It started life like this:

The wood looks pretty nice in this picture.  It is not.

I bought the magazine rack at an antique shop in town. Thrift shops seem to be littered with them, they must have been a '70s household staple, but like ashtrays that also clutter up second-hand shops, nobody uses them anymore.  As a nation we've apparently quit smoking and canceled our magazine subscriptions.  I was able to talk the owner down to $5 by playing the "hey, I'm a local, possible return shopper and I've got cash" card.  Sometimes it is good to live in a tourist town.  I liked the shape of it, with the little cutouts and it seemed sturdy enough for books.  A lot of the other old magazine racks I'd found had slat sides which I think can look a little messy once things are in them. Unfortunately, when I got it home I saw that the dark wood grain was hiding some flaws.  There was some warping in the wood and some general gaping.  But I figured that was fine since I was going to paint it anyway.

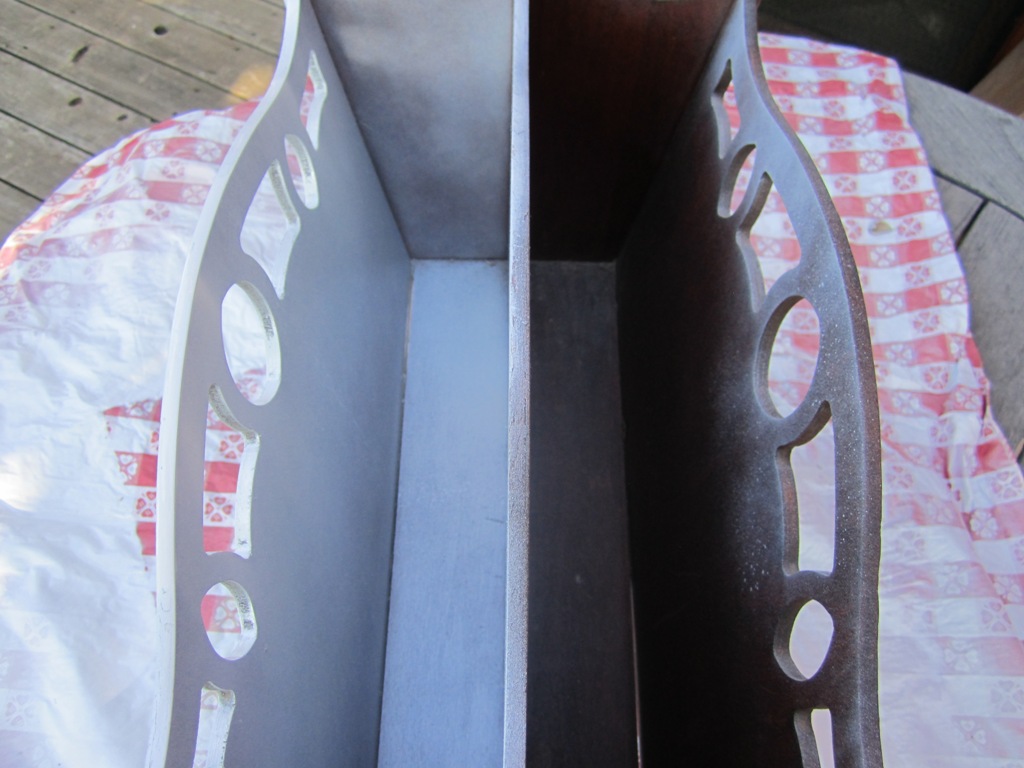
After seeing some of the amazing things people do with spray paint I decided I'd rather try that then break out my waterborne enamel.  Benjamin Moore Impervo is my secret love.  Last year I painted all of the dark redwood trim in my 4,000 sq ft house with it, but enamel is a lot of work.   Spray paint was fast, but it doubled the cost of the project pretty much.  I'm not sure if it was the fault of the less then perfect condition of the wood or my spray paint inexperience, but I got some weird cracking on my second coat (I waited 24 hrs in between so it wasn't wet).  It ended up looking like I'd glazed parts of the finish which is really not me.  I considered sanding it and repainting but I'm lazy, as discussed earlier, and so I just let it be.

The trigger is nice, but it's only 12 oz which isn't much.  I'll try a different brand next time.

  First coat.  At the bottom you can see some of the gapping.

After another day of drying I taped off squares and painted them with chalkboard paint. I've never used chalkboard paint before although I've had this can for months now.  The consistency is a little weird.  It's thick and has the viscosity of watered down pudding.  It's latex based so when I dripped on my work table I was able to wipe it up easily which was nice.  I used a foam brush to keep brush strokes to a minimum.  Even with my careful application, the paint bled in the wood grain, seeping into some, but not all, of the grooves.  Uneven and not cute.  Again, not sure if my taping wasn't up to par or if the wood was just not meant to take it.  My sharp squares weren't too sharp.  I nearly gave up on the project at this point.  It wasn't turning out like I had figured in my head which is why there are no pictures.  I waited another day and then decided to try to salvage it.  I used a smaller brush and just painted bubbly circles over the bleeds.  Again, not me.  I wasn't feeling it at all. 

You can see some of the uneveness in the wood and the crackling in the paint in you look close, bottom right hand corner and middle at the top. 


You have to wait 3 days to condition the chalkboard surface (you just rub it with the side of a piece of chalk to build up dust- doing it I remembered seeing teachers in elementary school do this after their boards were washed once a year).  The result of the conditioning is what saved the whole thing for me!  So, tip for beginners:  chalkboard paint doesn't have half the charm without the chalk.  It made a huge difference in the feel of the piece.  The stark black and white was transformed into a well loved schoolhouse-inspired look that made the effort worthwhile.  It's not perfect, but it is exactly what I needed.  It's imperfection will just keep me from freaking out when it gets knocked over with a soccer ball.


Cost:  Took about 6 days to finish because of drying times.  $5 for the piece, $12.50 for the spray paint.  I already had the foam brush, chalkboard paint (and used very little of it) so I'd say, total was less then $20.  Will probably pay for itself in avoided library fines.

Verdict:  Cute! Useful! Book-a-rific!  I need to work on my spray paint skills and now have to come up with something to do with the rest of that chalkboard paint...

BONUS:  Here's a tip to make your local librarian happy-  pass the books across the desk and don't return them in the drop box if you possibly can.  Emptying those boxes is a pain in the ass, especially if you are already standing behind the circ desk with a bar code scanner in your hand.

Linkys!


Thursday, March 24, 2011

Sewing How to Books: Quick Review of "One Yard Wonders"

I've bought 10+ sewing how-to books in the past three months. I know, I have a problem.  I've also checked some out of the library, but they get recalled too fast usually for me to make anything.  It takes me awhile to mentally commit to a project.  Usually longer then the project actually takes to complete!


I want to make everything on this cover.

I plan to review all of them, but I'll have to do it in batches or something. First up is One Yard Wonders from which I've already made a few things. The best part of this book is the great array of projects.  There are dozens and dozens!  And not just aprons and tea towels.  For value, number of projects vs. cost, this book is a winner.  Some are pretty uncomplicated (like how to line the back of a bookcase with fabric, which I'm not sure even counts as sewing) while others are fairly complicated, at least for beginners.  There's a good balance of easy, challenging and impossible projects for my (admittedly low) skill level.  Because of the number of projects there aren't as many photos as I'd like, for instance when I made the "All Ages Jumper", there was no photo of the elasticized back which was the tricky part for me. 

The book is spiral bound to lay flat which I appreciate and has a front pocket for the included patterns (I haven't made anything with them yet so I can't comment on their quality).  All the projects include directions on how to lay out the patterns for cutting as to use only 1 yard of fabric.  They point out where the selvage should be which I appreciate since the whole "grain" issue I haven't been able to grasp.  It has made me think before I do other projects about how I want to layout the pieces. 

I wish the projects were coded for difficulty like many of the other books. I also think there could have been a little more quality control in the instructions.  I stumbled online upon a list of corrections for nearly 20 projects in the book, including the "Twist & Shout" toddler skirt I already made my daughter.  Might explain my backwards piping!  The designs are all by various people, not just the authors. I assume there had been some sort of call for projects which might explain why some directions seem super detailed and others a bit more vague.

Next up from this book will be a dog bed (just like on the cover) for the office.  Our very own pug often follows us down to the winery and he isn't fond of the tile floor.  I know he'd just curl up and sleep instead of tripping up employees and chasing forklifts if he had a bed next to my desk. 

That might be wishful thinking.

My Cost: $13.53 (no tax or shipping), now even cheaper on Amazon.
Verdict:  Totally worth it. Great for brave beginners.

Friday, May 13, 2011

Sewing Project: Girl Detective Decor Set

I’ve been working on this group of projects for awhile. 


The Girl Detective as a codified concept is one very close to my heart and I love sharing it with Abby. I’ve studied the Girl Detective pretty closely as an adult, trying to figure out why she appeals to me so much, though it is pretty easy to see her value as a role model for young girls.

The Girl Detective heroine, (evolving over 70 years from Nancy Drew to Veronica Mars), is typically self-reliant, independent and unafraid. She chafes under the restrictions placed upon her by a sexist society. She is practical and tough, yet not without femininity or heart. There is a dash of frontier fierceness in her (with saloon girl names like Trixie, Ruby, Cherry, Lulu, Kit and Scout), but she is almost always kind. In fact, Girl Detective typically starts her sleuthing in a bid to help someone else. Being popular is low on her list of priorities. She oversteps often, people underestimate her to their own detriment, and she is always on top of it. Books are her friends, information her currency, truth her goal. She questions and questions authority. Social status and class have limited merit in Girl Detective’s world. Most of all, she has things to do, people. Painting her nails is not one of them. Solving a mystery requires diligence, research and organization. Girl Detective isn’t glamorous; Girl Detective is one smart cookie.

I made this set for my daughter, though I might make more or other variations for my Etsy shop. I’ve got some Boy Explorer stuff in there already that I did for Henry.


There are two pillows. The first pink one was pretty simple to make. I traced the outline of the words onto the fabric (a super soft pink denim) using a light box and a pencil. I used the same font from the word cloud piece (below) so that they would match.

My much abused lightbox. 
My only complaint is that sometimes it is so bright I can't tell if I've actually traced over something or not!

I used a simple backstitch to do the embroidery. Tracing the words first made it so they were very straight across the bottom (see my Peace Pillow for a looksie at what happens when you use your own handwriting). I really debated on what color thread to use, but the gray on pink I like a lot. I think black on red would look great too maybe with a little small print red and white argyle.  Then it would be a little less “girly”, but Abby is four and her room right now pink and red with dashes of blue. I sewed it with an envelope closure so I could take it off and wash it and also so my daughter could stash her flashlight in there for reading in bed. I had to do a bunch of math to get the dimensions right. Tip for beginners:  do the math before you do the embroidery.  This could have been a embroidery disaster of epic proportions.  Another tip:  Striped fabric is both a blessing and a curse.  It's easy to see where your stitches aren't straight, but it also easy to line up and keep straight when sewing. 

I still use a wooden hoop. 
I know, Old Skool, but it seems wrong to be doing such a traditional art with a plastic hoop.
The second pillow is a work in progress... i.e., I haven't finished it.  I still have to do all the streets and the arrows.  That embroidery so far was no joke.  It is a “Girl Detective Mystery Map”, a small town sleuths’ guide to investigation hot spots including the Library, the Sheriff’s Dept, Old Man Given’s creepy estate, the Abandon Goldmine, the Museum, The Hall of Records, etc. I used four different hand stitches, trying to give it some dimension and depth that is always a little hard to see in a photo.


Crucial to the project will be adding the words to the pictures, see the original sketch below. I haven’t come to a conclusion on how to do that yet. It will need to look neat and still be readable. Fabric transfer paper? Something done with my Cricut? Markers are out- they bleed on that white cotton fabric and I want it to be washable. Suggestions??? Maybe something with a real typewriter?  Perhaps clear vinyl pockets for slips of paper?  Maybe I could put clues on the back. Or names of possible mysteries? I sketched out the map and then transferred it to the fabric, just like with the pink pillow. I had to keep in mind that the images need to be simple and bold enough to be outlined with thread. This would have been much easier if I could draw. Feel free to try it yourself! If you do, I want to see. Not as easy as it looks.

Pretty sure there's a reason I have a degree in Art History and not Art.

This is the symbol for the Lemontree Cafe: good for gossip and pie! 
When Girl Detective gets older she can work there after school.

The Tully Mansion:  There's something suspicious about those Tullys. 
How'd they get all that money anyway?

Miss Katie's Farm:  borders the river across from creepy Old Man Givens
and is close to the abandon gold mine.  Somebody keeps killing her rose garden, but who and why?

The small piece of embroidery below was made to fit in a standard 4” X 6” frame, to sit on a desk or a nightstand. Abby keeps moving it around and it is currently in her play kitchen sink. I don’t take it personally.  I kept with the same color scheme so they'd work together when finished.

These photos make me want to iron everything.

See?  Matchy-matchy!

Below is a no-sew companion piece I made months ago to go with Henry’s Boy Explorer word cloud of fun.  It's printed on vellum and layered over cardstock so the words appear to float at different depths. In person.  Not so much on film.  They were both based on an even earlier project from last summer where I wrote up job listings (I work in HR so it was fun for me, shut up!) for both Girl Detective and Boy Explorer. They were really wordy (but cute!) so this was my compromise, pulling out some of the phrases and highlighting them.  It is 8"X10" for a standard frame.


Cost:  I had everything on hand from earlier projects, but if I'd had to buy everything... I don't know $20?  In time and love this was priceless.  Particularly in time...

Verdict:  I wish could draw better.  I'll revisit this again, I'm sure.  Maybe with the help of someone who doesn't suck.  I'll post the map pillow when I get it totally complete.

Linkys!:


Upcoming Projects: Not Yet Blogged

a rundown of what I've been up to: DIY wedding dress, "Back to School Night" decor, Flower Arranging for the Incomptent, more jam labels, a dog bed solution, paper embroidery, flying pig needlework, attempting to scrapbook, make your own board game kit, Link from Zelda costume, organinzing for homework, and how to build an afterschooling program!

how to declutter after a death... and how not to do it

what do you do with all your fat clothes? Make doll clothes!