Monday, May 28, 2012

Alter or Destroy: Black & White Cotton Dress

I have some thinking to do and plenty of other projects before I tackle this one but I thought I'd share anyway.  I've found a great use for Mabel Mae, my new dress form (I seriously considered "Patsy" as a name so that I could blame her for everything I screw up, but thought that was mean).  She can help figure out what the hell is wrong with this dress!  Mabel Mae is a dress detective!


So cute, right?!  Slight problem, the upper waist, just around the rib cage is way too tight.  The top of the bust just fits and the lower waist and hips fit great.  At first I was upset with myself because it didn't fit, but then I was like, "My ribs?  Really?  My ribcage is too big now?" and realized that was probably the dress and not me.  And I was right. 

See how the top comes together at the hook and eye? But the rest is a no-go.  This picture makes it look way closer then it actually is- that gap is big.

Meanwhile the lower waist and hips have plenty of room to spare. The zipper goes down quite a bit, over the hips to the top of the thigh. It's a little more then half way down in this photo.

It doesn't even fit the dress form and she is, technically, perfect.   I'm not sure who is a 40DD with a 30 inch ribcage, but I've got the dress for you if you are out there, mutant!  As far as I can tell, the factory where this was made cheated the full-bust adjustment- adding depth to the front but not lengthening or widening any other part of the pattern. According to the tag the dress was "designed" in L.A. and made in China.  I'm sure a standard set of numbers were given and extrapolated on by whoever makes those decisions on the factory floor.  Probably someone without boobs. 

I could return the dress... but I'm not going to do that.  I'm going to take a gamble and see if I can fix it. I'll either alter it or destroy it!  I feel like a mad scientist!  Wooha-haha!

The dress is cotton (as is the lining) so adding some sort of panel seems like a good possibility.  But where?  And how?   I don't really want to mess with the invisible zipper, but that might be impossible. The stripes make things tricky too.  Here are the options I've come up with:

1. Insert a full panel (pieced, I think? maybe not, maybe more like a racing stripe) all the way down the none-zippered side seam.  Drawback? That will mess up the pretty way the strips are matched to each other. 

They did a pretty good job matching the stripes- not perfect, but not bad for a dress that was less then $100 retail. 

It would also make the lower waist and hips less fitted since they aren't too small now.  A bummer, but less of a bummer then not wearing the dress at all.   I could possible find the same fabric or go with a contrasting color like pink or red or just a solid black.  Very Project Runway Mondo-esque, perhaps?


Okay, maybe something a little more subtle.
A different pattern could work for sure. The dress is so stripey anyway it won't look that strange if you don't know how it is supposed to look. 

Maybe something like this? 

How much do you want to bet my husband tries to scan me with his phone? 
Like that's not going to happen... don't take that bet.

2.  Insert a gusset along the invisible zipper.  This would of course require me to remove the zipper and replace it.  Drawbacks?  My very limited experience with zippers makes this scary.  A gusset  would mess up the pretty pattern too.  However, a gusset might look neater then an added panel.  Particularly in a contrasting fabric- a smaller triangle of color vs. a stripe.  It would probably stand out more though and I'm not sure I want my alterations actually attracting attention. My only issue is that the zipper is currently longer then I would need the gusset since it's just my ribs and bust that need the adjustment.  I'm not sure how to work that as far as inserting the zipper in the new seam.

Could use a fun contrast:


Wouldn't have to worry too much about it being straight.
 or something like this: 

Subtle and girly, fancy black eyelet.  Obviously, I'd line it with white. 


 3.  Add inches to the waist band.  Not just around, but up too.  This would lower the waistband from around my ribs and add some space to breath.  Because I'm short enough I could hem the dress a couple of inches without a problem to get some perfectly matched fabric to do this work,although the stripe would be running the opposite way.


I think, based on my zero experience, that this alteration would make it harder to sew the dress back together. 


Drawback: it wouldn't alter the upper part of the bust which does fit, tightly, and I feel if I'm going to all this effort I might as well make it fit nicely everywhere.  I would still have to mess with the zipper.

4:  Screw it and chop up the dress as a pattern to make another dress, adding inches where needed.  Drawback?  That's an $80+ pattern, plus the cost of new fabric. This will be my fall back if things go poorly with the alterations.

We'll see!  I still have slipcovers to finish, some curtains to hem and another dress to make before I commit myself to re-working this one-  maybe I'll lose a rib in a freak napping accident in the meantime and I won't have to touch it.  Never know!

Tuesday, May 22, 2012

New Dress Form Fun!

This was my Mother's Day gift to myself:  a professional dress form.  Project Runway eat your heart out!  She needs a name which I'm not settled on yet.  All name suggestions welcomed! As long as you are okay with them being disregarded if they suck.

It may look like I've already spilled cabernet on her, but no.  That red tinge across the bust is just the bad lighting.  


Isn't she lovely?  Not having a head is very slimming.

I can add an arm later if I want.  Build-a-lady!

I poked around and considered a bunch of different options.  The entry-level adjustable models (Dritz, Singer, etc.) that you can pick up at Joann's and other chain stores just didn't look very well made to me.  Plus, I couldn't get over the spacing that goes down the middle.  What if you have to fit something there?  The real deciding factor was the wheels.  I'm going to have to be moving her around a lot since I sew in my dining room. Her rolling base is a solid 25 lbs of metal and real, not plastic, casters. SOLD!

I have no idea what the cage is really for, only that it's considered better then not having one.  Feel free to fill me in if you know the why.  

Plus, she isn't an ugly color, just a neutral linen.  Which I realize shouldn't be an issue.  That said, who wants a red dress form?  It would be a distraction to me and I'd hate it clashing with my decor, even when I'm the only one looking at it.

There are some small issues.  She was a total bitch to put together even with my husband's help.  In fact, I doubt she's assembled correctly.  Technically she is height adjustable, but since I'm 5 feet that's hardly an issue.  At her lowest setting she's still a bit taller then me.  I'll just imagine I'm wearing heels.


Gratuitous new shoe photo-  their cork!  I live in a vineyard!  Yes?  No?  Well, I was amused.

And they were on sale!  Thank you Macy's!  Maybe I should sew in them.

The other issue is the sizing.  She matches up pretty well with some slight problems:  the hip to waist ratio is off a bit, but I'm an oddball so that isn't surprising.  I don't wear form fitting outfits anyway.  The bust measurements are great on paper but I realize now that a goodly portion of my inches are on the front and nearly half of hers are across the back.  I'm not sure how much that matters if you are doing a full-bust adjustment on most patterns anyway (which I am), but we'll see.  Mostly I want to use her for draping.

That is some serious princess seaming.

Because she isn't adjustable if I lose more then, say, 15 lbs I'll be sized out.  Which since it took me a year to lose 42 lbs I'll not be holding my breath.  I figure I'll just sell her on Craigslist and reward myself with a new one when that (glorious) day comes.

A name, an after-use review, and some dressed photos coming to the blog soon!

Monday, May 21, 2012

Hello Kitty Birthday: A Dress & Other Homemade Sweet Things

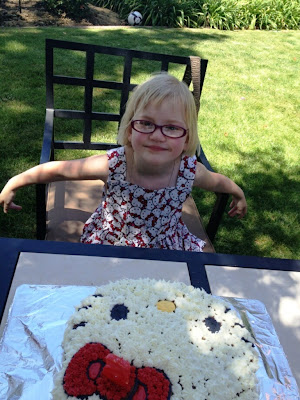
I'm behind on my blogging so I'm just going to jump in again.  The weekend before last we celebrated my daughter's 5th birthday with a Hello Kitty themed celebration.

I also made, but took no photos of, a whole set of small Hello Kitty coloring books.  This was the cover.  Thank god for the "booklet" and "suppress background" settings on the office printer.  

I promised her a Hello Kitty dress (why? why would I do that?) and was only able to find one licensed fabric when doing my last minute scramble at Joann's.  In addition to being a really busy pattern, the quality of the fabric was not high.  But it was all they had three days before the party so I bought it.  There's a lesson there, but it escapes me.

It's hard to tell since, like an eclipse, you can't actually look directly at this pattern without damaging your eyesight, but the background is pink and HK's bows are red.  Abby's two favorite colors!  (P.S. The solar eclipse yesterday afternoon was super awesome-  I may be blind.)

Thankfully, it has been sunny so the thin fabric worked fine, though I did line the bodice with muslin.  I starched the hell out of the skirt too which helped.  I used the same bodice pattern I've now used four times, but changed it again and simply sewed the straps to the back- no buttons or Velcro.  I remembered to reduce the width of the straps too and it made a huge difference.  I intended to use a 4 inch zipper, but realized it wasn't necessary.  I could slip the whole thing over her head and save myself the effort.

I've been trying to pin horizontally and not vertically like I'm supposed to do for garments, but it is REALLY hard .  Guess I've already developed bad sewing habits.

The biggest pain was the gathering on the skirt.  I'm just not good at it yet.  I need more practice.  I have a gathering foot that I need to give a whirl one day.   I just have to give myself enough time to mess around without a hard deadline.

Look carefully.  There were so many frayed threads from the cheap fabric that finding the gathering threads was  a stressful task.


The cake was my sister Anna's doing. Abby loved it with all of her little heart and soul. I think it is one of those things she'll never forget.  Which is good since it took Anna forever and she might never bake anything again.

I cannot believe Abigail is five years old.  My sweet girl.  

How awesome is that?  See the crazy-cool things Anna does with nail polish here.  Apparently, she was able to transfer those skills over to cream cheese frosting because the cake was amazing (and tasted pretty damn good too). Mmm.  Spice cake.

A boy at the party got within inches of pouring bubble solution on the cake in an effort to put out the candle.  No joke.  

My sweet contribution were two dozen Hello Kitty cookies:

Step 1 (actually step like ten million, but for illustrative purposes, let's say 1):
Hello Kitty's distinct bow.  Dark pink was as close to red as I could get it.

Step 2:  Background takes 24 hours to set before you can finish decorating.

Step 3:  Little faces!  All prepared to be consumed and promptly forgotten. 

I followed directions, step by step, from The Sweet Adventures of Sugarbelle. (Do not compare mine to hers- it will make Hello Kitty sad.) To get to the point where I could even follow those directions I had to delve pretty deep into some baking blogs. I learned more then I ever wanted to know about royal icing.  Sugarbelle's site was by far the most helpful!  Her comparisons to household products for consistency is just genius and is super helpful for a beginner.  I especially liked how she saved the toothpaste after one blog demonstration and made her kids use it. That's my kind of blogger!  Once I prepped everything, the actual cookie making wasn't too hard.  I think I will be volunteering for the bake sales with themed cookies next year! You know, in my free time.

Notes on the project:  Dress was made in considerably less time and with substantially less stress then the cookies.  Both were adorable.

Cost:  The fabric was on sale 40% off and I bought 2 yards for a total of about $8.  The zipper was an additional $1.96,  but I didn't end up using it.  I had the muslin and thread on hand.  Pretty sure I will never use the Hello Kitty cookie cutters or cake pan again but I like to think of them as sunk costs anyway.  I did buy 8 Wilton candy bottles for "flooding" the cookies (that's my new cookie lingo in effect, folks!), some oil free butter flavoring, 4 lbs of confectioners sugar, some cake release stuff, two new cookie sheets, a new box of disposable pastry bags, and a couple extra small tips for about $120-ish.  The frosting, dye and cake mix were all on hand for the Hello Kitty cake so that cost was $0 and about 8 hours of Anna's time. She is the best Auntie ever!  Seriously, that was an act of uncalled for awesome-auntieness. 

Verdict:  Success!  The dress has already been worn again, though one of the seams came loose.  The cookies were cute and not inedible.  I flavored the dough with vanilla and the royal icing with butter flavor, but neither with a strong enough hand.  Next time I will do my best to find some oil free extract for the icing that is tastier. 


Upcoming Projects: Not Yet Blogged

a rundown of what I've been up to: DIY wedding dress, "Back to School Night" decor, Flower Arranging for the Incomptent, more jam labels, a dog bed solution, paper embroidery, flying pig needlework, attempting to scrapbook, make your own board game kit, Link from Zelda costume, organinzing for homework, and how to build an afterschooling program!

how to declutter after a death... and how not to do it

what do you do with all your fat clothes? Make doll clothes!